
Holidays like St. Patrick’s Day have a way of sneaking up on people. One minute you’re putting away Valentine’s decorations, and the next you’re realizing you need to bring something green to a work potluck, a school event, or a family get-together — all while your calendar is full and your grocery budget is already stretched.
If you’ve ever stood in the kitchen the night before a party debating whether to bake, grab something from the grocery store, or quietly hope no one notices if you don’t show up, you’re not alone. Wanting to participate and make something fun is real — but so is being tired, short on time, and unwilling to overspend for a holiday that comes and goes quickly.
That’s where a little planning makes a big difference.
The focus here is on make-ahead St. Patrick’s Day desserts while making sure to keep the desserts on a budget. Desserts you can prepare early, tuck away in the fridge or freezer, and pull out with confidence when it’s time to go. Every recipe was chosen with real life in mind: affordable ingredients you can find anywhere, prep that fits into a normal evening, and storage that actually holds up until party day.
Read my full disclosure here if you’d like the details.
PIN IT FOR LATER TO YOUR FAVORITE PINTEREST BOARD

No-Bake and Chill
Why It’s Worth Making
- It feels special without being expensive or time-consuming, making it ideal when you want a reliable centerpiece dessert that can be made well ahead.
- Is this realistic for my schedule?
Yes. This is a true make-ahead dessert that can be fully prepared 1–2 days before your party and kept chilled until serving. - How much hands-on time does this actually take?
About 20–25 minutes of hands-on prep. The rest is refrigerator time while it sets. - Do I have the skills and tools for this?
Very beginner-friendly. You’ll need a mixing bowl, hand mixer (or sturdy whisk), and a springform pan or pie dish. - Will this fit my budget?
Yes. Estimated cost is about $0.75–$1.00 per serving, especially if you use store-brand cream cheese and whipped topping. - How does this need to be stored pre-party?
Store covered in the refrigerator. This recipe should not be frozen, as the texture is best when chilled only. - Is this easy to transport or serve at a party?
Yes. Chill thoroughly, then transport in the pan with a tight lid or foil cover. Slices cleanly when cold. - How can I put my own spin on this?
Swap in chocolate cookie crumbs for the crust, add mint extract, or drizzle with chocolate syrup before serving. - What kind of party is this recipe for?
Perfect for casual home gatherings, potlucks, or any party where you want a festive dessert without having to bake.
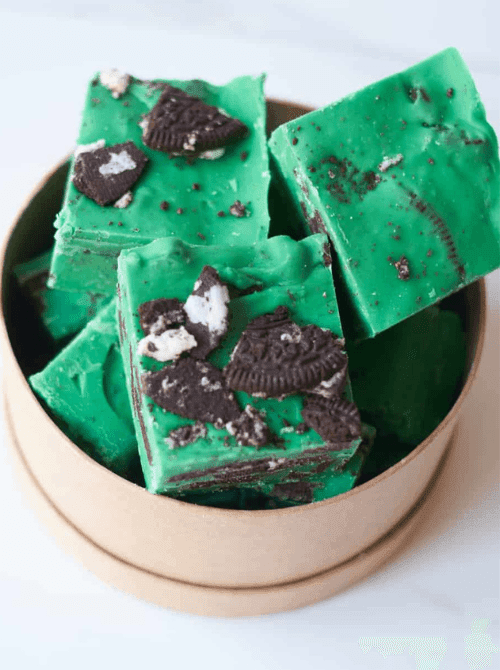
Why It’s Worth Making
- It’s ideal when you need something festive that stretches ingredients and still feels indulgent.
- Is this realistic for my schedule?
Absolutely. This fudge can be made 3–5 days ahead and stored until party time. - How much hands-on time does this actually take?
Roughly 10–15 minutes of prep, plus chilling time to firm up. - Do I have the skills and tools for this?
No special skills. You’ll need a saucepan, spoon, and an 8×8 pan. - Will this fit my budget?
Yes. Estimated cost is $0.40–$0.60 per piece, especially if Oreos are bought on sale. - How does this need to be stored pre-party?
Store in the refrigerator or freezer. If freezing, thaw slightly before slicing for clean cuts. - Is this easy to transport or serve at a party?
Very easy. Cut into squares and transport in a container lined with parchment paper. - How can I put my own spin on this?
Add crushed Andes mints, swap Oreos for generic chocolate sandwich cookies, or drizzle with white chocolate. - What kind of party is this recipe for?
Great for large crowds, dessert tables, or school and work parties.
Why It’s Worth Making
- This pie brings classic Irish-inspired flavor and it’s a great choice when you want something different from cookies.
- Is this realistic for my schedule?
Yes. This pie is designed to be made a day ahead and chilled overnight. - How much hands-on time does this actually take?
About 20 minutes of active prep time. - Do I have the skills and tools for this?
Beginner-friendly. You’ll need a mixing bowl, spoon, and a standard pie dish. - Will this fit my budget?
Moderately budget-friendly at $0.80–$1.10 per slice, depending on whether you use store-brand liqueur alternatives or mint flavoring. - How does this need to be stored pre-party?
Keep refrigerated until serving. Do not leave out for extended periods. - Is this easy to transport or serve at a party?
Best for parties where refrigeration is available. Transport in a cooler with ice packs if needed. - How can I put my own spin on this?
Use chocolate cookie crust, adjust mint intensity, or skip alcohol for a family-friendly version. - What kind of party is this recipe for?
Best for adult gatherings or dinner parties where a retro dessert fits the vibe.
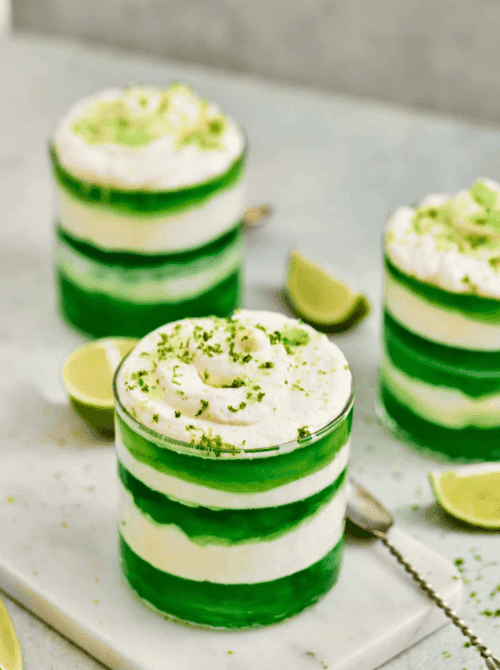
Why It’s Worth Making
- These parfaits are inexpensive, colorful, and ideal when you need something festive that’s quick and kid-approved.
- Is this realistic for my schedule?
Yes. These can be assembled the night before and chilled until serving. - How much hands-on time does this actually take?
About 15–20 minutes total, especially if assembling multiple cups at once. - Do I have the skills and tools for this?
No baking skills required. Just bowls, spoons, and clear cups. - Will this fit my budget?
Very budget-friendly at $0.30–$0.50 per serving. - How does this need to be stored pre-party?
Store covered in the refrigerator. Best served within 24 hours for optimal texture. - Is this easy to transport or serve at a party?
Extremely easy. Individual portions make transport and serving simple. - How can I put my own spin on this?
Layer with whipped topping, add crushed cookies, or swap gelatin flavors. - What kind of party is this recipe for?
Perfect for kids’ parties, school events, or casual family celebrations.
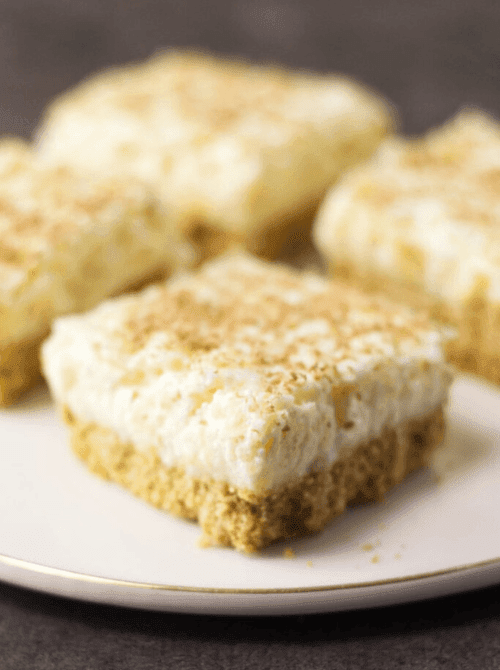
Why It’s Worth Making
- It’s a refreshing option that balances richer desserts on the table.
- Is this realistic for my schedule?
Yes. This traybake can be made 2–3 days ahead and stored until serving. - How much hands-on time does this actually take?
Around 20 minutes of prep time. - Do I have the skills and tools for this?
Beginner-level. Requires a mixing bowl and a square baking dish. - Will this fit my budget?
Yes. Estimated cost is $0.50–$0.70 per serving, using canned pineapple and basic pantry ingredients. - How does this need to be stored pre-party?
Store covered in the refrigerator to maintain structure. - Is this easy to transport or serve at a party?
Yes. Slice into squares and transport in the baking dish or a lidded container. - How can I put my own spin on this?
Add coconut, swap pineapple for mandarin oranges, or sprinkle with green decorations for St. Patrick’s Day. - What kind of party is this recipe for?
Great for potlucks, buffet-style parties, or dessert tables.
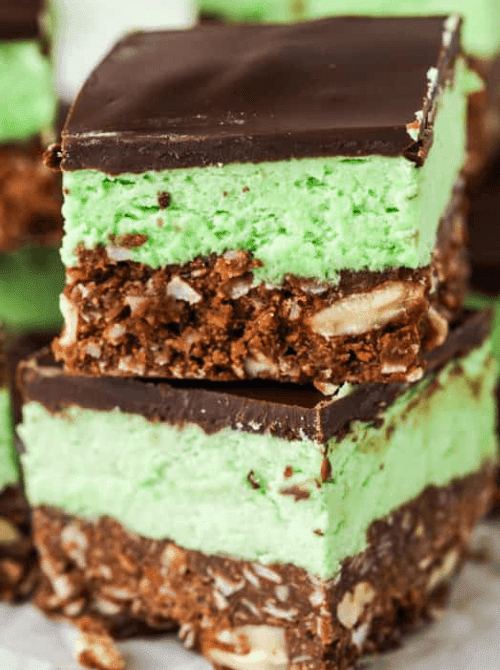
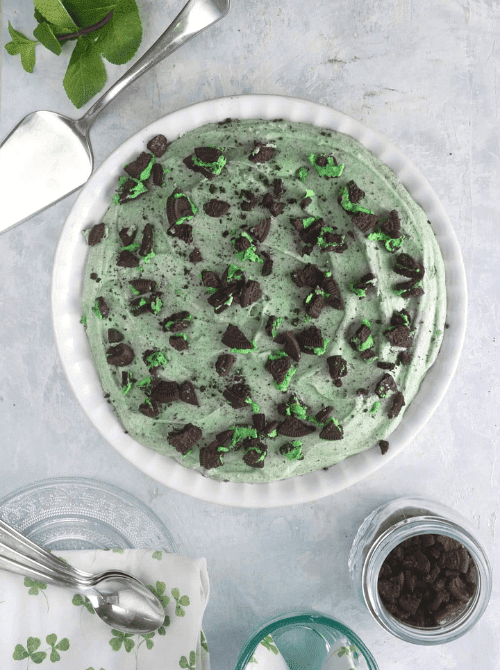
Why It’s Worth Making
- These bars feel indulgent and are perfect when you want a show-stopper dessert that doesn’t require extensive work.
- Is this realistic for my schedule?
Yes. Nanaimo bars can be made several days ahead and stored until serving. - How much hands-on time does this actually take?
About 25–30 minutes, plus chilling time. - Do I have the skills and tools for this?
Intermediate-friendly but manageable. You’ll need a saucepan, mixing bowl, and square pan. - Will this fit my budget?
Moderate but reasonable at $0.60–$0.85 per bar, depending on chocolate prices. - How does this need to be stored pre-party?
Refrigerate until firm. Can also be frozen and thawed slightly before serving. - Is this easy to transport or serve at a party?
Yes. Once chilled, bars hold their shape well for transport. - How can I put my own spin on this?
Adjust the mint level, swap chocolate layers, or cut into smaller portions to stretch servings. - What kind of party is this recipe for?
Ideal for dessert tables, adult gatherings, or anyone who loves rich, layered treats.
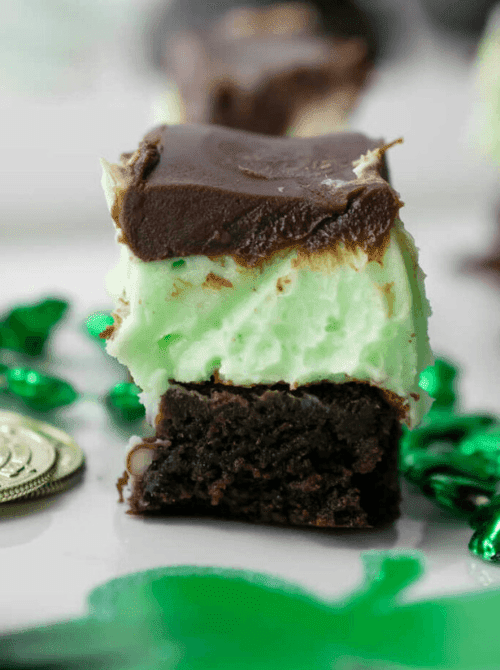
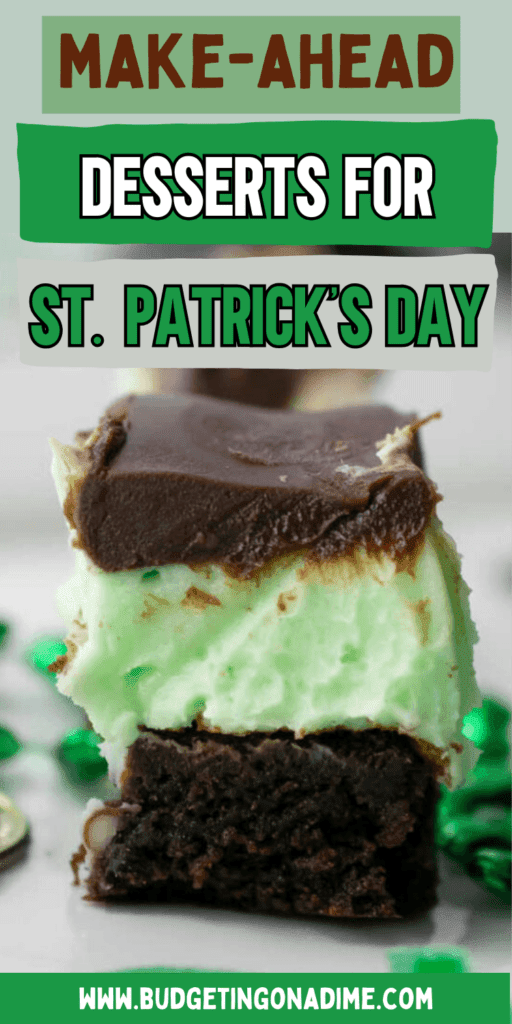
Brownies and Truffles
Why It’s Worth Making
- These brownies feel festive without being overly complicated and they’re easy to portion depending on your needs.
- Is this realistic for my schedule?
Yes — these brownies are made entirely ahead of time and are fine resting overnight or a couple days before your event. - How much hands-on time does this actually take?
About 25–30 minutes to prepare and bake, then simply let cool. - Do I have the skills and tools for this?
Yes. Standard baking tools are all you need: a bowl, baking pan, and oven. - Will this fit my budget?
Moderate — estimated $0.90–$1.20 per serving, especially when Bailey’s (or flavored coffee creamer alternative) is used in place of more expensive alcohol. - How does this need to be stored pre-party?
Store at room temperature in an airtight container for 1–2 days, or refrigerate if it’s warm. They can also be frozen and thawed well. - Is this easy to transport or serve at a party?
Yes — brownies travel well when wrapped or packed in a container. Cut them before serving or offer as bars. - How can I put my own spin on this?
Add chopped mint chocolate, top with sea salt, or swirl in cool-whip and mint extract for a richer profile. - What kind of party is this recipe for?
Great for adult gatherings, dessert tables, or potlucks where a slightly more indulgent treat is wanted.
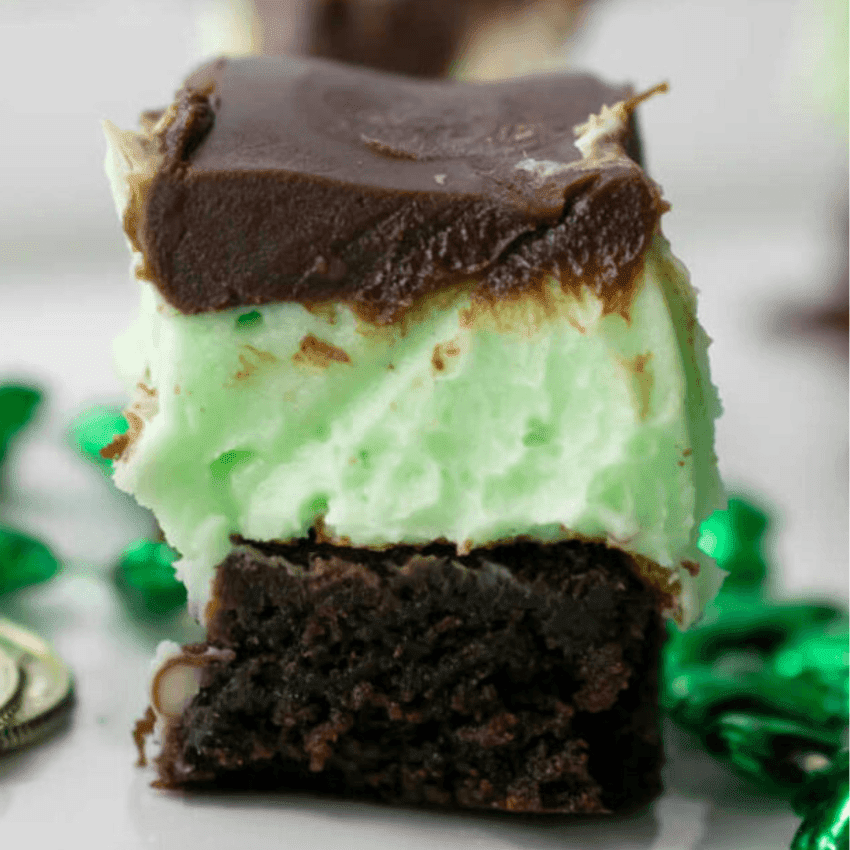
Why It’s Worth Making
- These brownies hit the sweet spot between classic comfort and holiday flavor.
- Is this realistic for my schedule?
Totally. These brownies can be baked ahead and either served at room temperature or chilled for a couple of days. - How much hands-on time does this actually take?
About 25 minutes of actual work, plus bake time. - Do I have the skills and tools for this?
Yes — it’s basic baking. You’ll need an oven, mixing bowl, and square pan. - Will this fit my budget?
Yes. Estimated cost is $0.70–$1.00 per serving when using store-brand cocoa and mint extract instead of pricier ingredients. - How does this need to be stored pre-party?
Store in an airtight container on the counter or in the fridge if your kitchen is warm. These brownies also freeze well. - Is this easy to transport or serve at a party?
Very easy. Cut into squares and pack in layers with parchment paper if needed. - How can I put my own spin on this?
Stir in chocolate chips, add crushed candy canes for color contrast, or swirl peanut butter on top before baking. - What kind of party is this recipe for?
Perfect for family celebrations, casual holiday spreads, or any event where you want a classic treat with a minty twist.
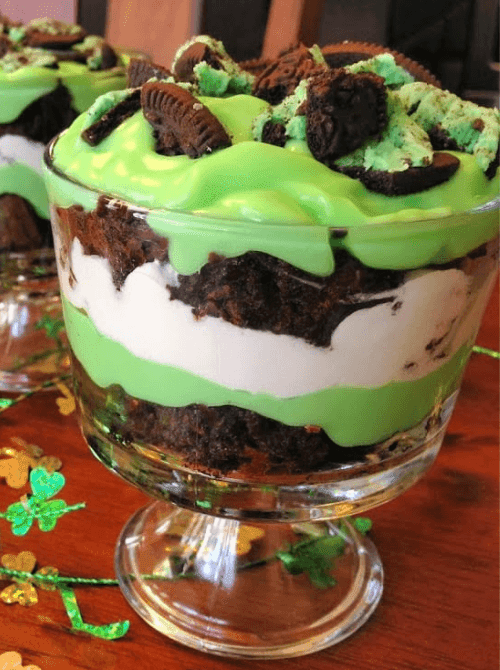
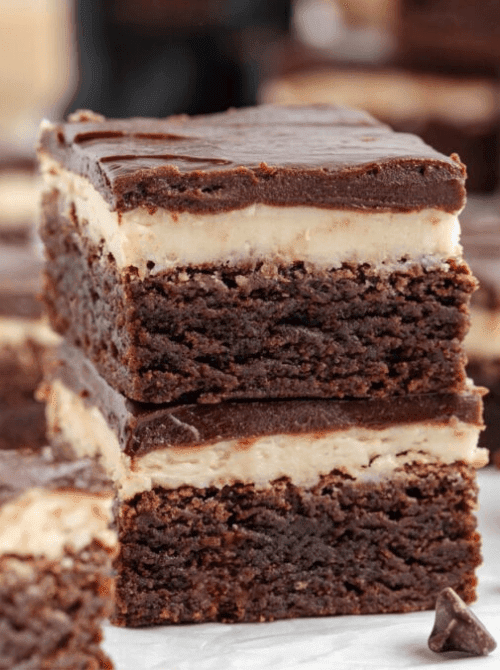
Why It’s Worth Making
- This brownie trifle stands out because it turns simple brownies into a rich dessert that looks impressive with very little effort.
- Is this realistic for my schedule?
Yes — this trifle is designed to be made in stages. You can bake brownies 1–2 days ahead and assemble the layers the night before your party. - How much hands-on time does this actually take?
About 30–40 minutes of active prep time, mostly assembling and layering. - Do I have the skills and tools for this?
Mostly yes. You’ll need a mixing bowl, baking pan for brownies, and a trifle dish (or clear serving bowl). Basic layering skills are all that’s needed. - Will this fit my budget?
Moderately — estimated cost is about $1.00–$1.30 per serving when using budget brownie mix and store-brand pudding and topping. - How does this need to be stored pre-party?
Once assembled, cover and refrigerate. This dessert must stay chilled; don’t leave it at room temperature for long. - Is this easy to transport or serve at a party?
Transporting a fully assembled trifle is tricky. It’s easiest to assemble on site or use disposable cups layered individually for transport. - How can I put my own spin on this?
Add mint extract to the whipped layer, incorporate crushed cookies between layers, or top with green sprinkles for extra St. Patrick’s flair. - What kind of party is this recipe for?
This is great for family dinners, casual get-togethers, and buffet-style parties where a show-stopping dessert adds visual impact.
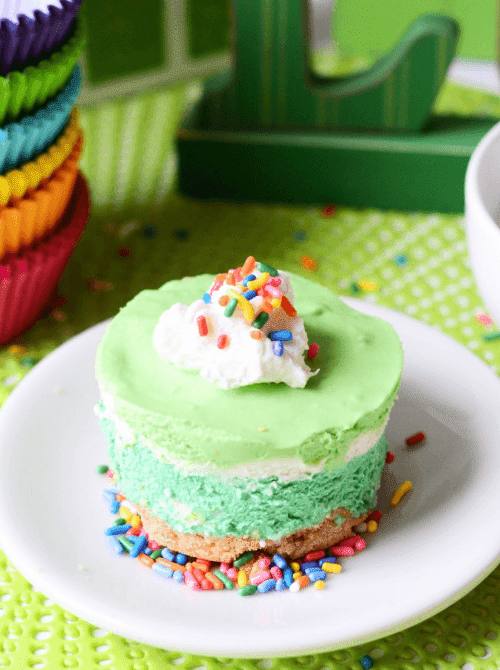
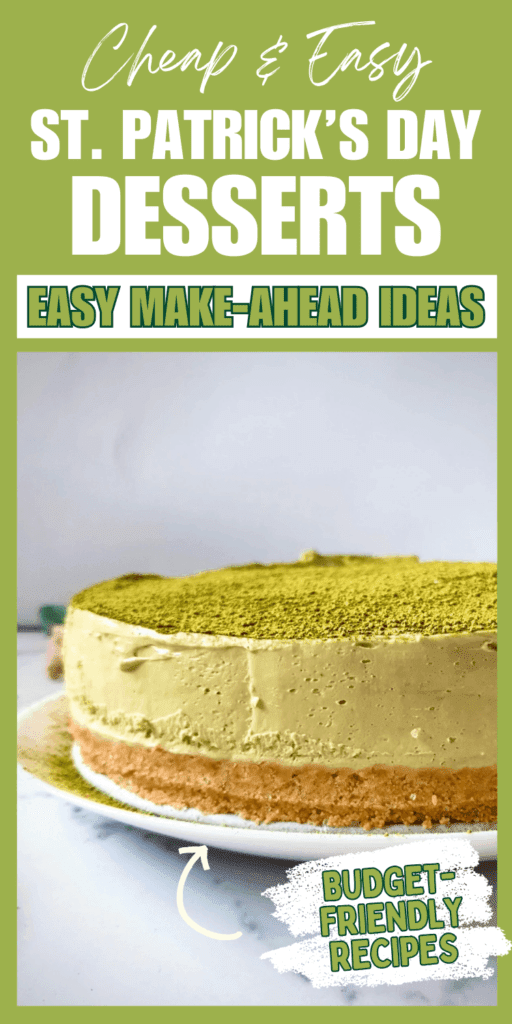
Cheesecake
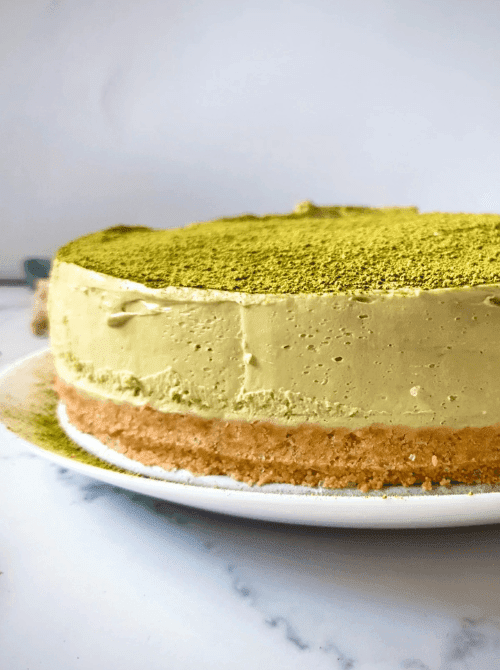
Why It’s Worth Making
- Its green hue and creamy texture tie perfectly to the St. Patrick’s Day theme, making it a memorable, budget-bright addition to your party.
- Is this realistic for my schedule?
Absolutely — this matcha cheesecake is a classic make-ahead recipe. It benefits from a night in the fridge to fully set. - How much hands-on time does this actually take?
About 30 minutes of active prep plus time in the fridge. - Do I have the skills and tools for this?
Yes — you’ll need a springform pan and a mixer. Matcha requires careful mixing to avoid lumps, but the skill level is still beginner-friendly. - Will this fit my budget?
Budget-friendly for a cheesecake — estimated $1.10–$1.40 per serving when using store-brand dairy and matcha powders on sale. - How does this need to be stored pre-party?
Keep in the refrigerator until serving. Cover tightly so the matcha flavor stays fresh. - Is this easy to transport or serve at a party?
Yes — transport chilled, ideally in a cake carrier or wrapped securely. - How can I put my own spin on this?
Top with white chocolate curls, raspberry sauce for color contrast, or a dusting of extra matcha before serving. - What kind of party is this recipe for?
Great for dessert tables or when you want something a little different from traditional cheesecake flavors.
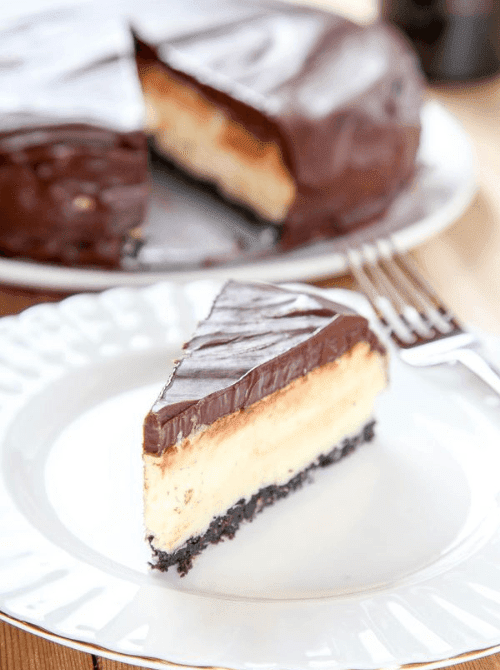
Why It’s Worth Making
- This cheesecake delivers festive indulgence with a St. Patrick’s Day twist. It feels luxurious without hard work.
- Is this realistic for my schedule?
Yes — this cheesecake is ideal for make-ahead. You’ll want to make it at least 1–2 days before your party so it has plenty of chill time. - How much hands-on time does this actually take?
About 30–40 minutes of active prep, then it sets in the fridge. - Do I have the skills and tools for this?
Mostly yes — you need a springform pan, mixer (hand or stand), and basic baking tools. It’s beginner-friendly if you follow the steps. - Will this fit my budget?
Moderate but reasonable — estimated $1.20–$1.50 per serving. Using store-brand cream cheese and substituting Irish cream liqueur with flavored coffee creamer keeps the cost down. - How does this need to be stored pre-party?
Refrigerate covered. This is best served cold and should stay chilled until plating. - Is this easy to transport or serve at a party?
Yes — cheesecakes travel well when chilled. A springform pan with a secure lid or a cake carrier works best. - How can I put my own spin on this?
Add a chocolate drizzle, swap the crust to chocolate instead of graham, or fold in extra mint extract for a stronger flavor. - What kind of party is this recipe for?
Perfect for adults or celebrations where a richer dessert is welcomed, like family dinners or evening parties.
Ice Cream

Why It’s Worth Making
- It’s ideal if you want something cool and crowd-pleasing on your dessert table that still feels tied to the theme.
- Is this realistic for my schedule?
Yes! This ice cream recipe is a great make-ahead dessert because it just needs to churn and then chill in the freezer. You can make it several days before your party with minimal effort on the day of. - How much hands-on time does this actually take?
About 15–20 minutes of hands-on time to mix and combine ingredients before letting the ice cream maker do the work. - Do I have the skills and tools for this?
You will need an ice cream maker — either a freezer-bowl model or one with a compressor. As long as you have that and basic mixing tools, the technique is very straightforward. - Will this fit my budget?
Moderate but doable — estimated $1.25–$1.60 per scoop/serving depending on the price of cream and Bailey’s (or your chosen Irish-cream alternative). Using a lesser expensive cream liqueur alternative helps keep cost down. - How does this need to be stored pre-party?
After churning, transfer the ice cream to an airtight, freezer-safe container and store in the freezer until serving. Press a piece of parchment paper over the surface before sealing to prevent ice crystals. - Is this easy to transport or serve at a party?
Ice cream needs a bit more thought for transport. Keep it in a cooler with ice packs if you’re traveling, and scoop just before serving to keep it from melting. - How can I put my own spin on this?
Stir in crushed chocolate cookies, add a ripple of fudge or caramel, or sprinkle with crushed Andes mints for extra St. Patrick’s flair. Create a make-your-own Sundae bar with the toppings in small bowls so guests can choose their ideal toppings. - What kind of party is this recipe for?
Perfect for summer Irish-themed parties or gatherings where a chilled dessert feels refreshing and festive.
A Stress-Free Make-Ahead Party Schedule
One of the easiest ways to enjoy St. Patrick’s Day is to stop treating dessert like a last-minute task. A simple timeline lets you spread the work out over a few days, use your time more intentionally, and avoid the late-night rush before a party.
This schedule is flexible — think of it as a guide, not a checklist. Choose what fits your week and ignore the rest.
5–6 Days Before the Party
This is the sweet spot for desserts that freeze well or benefit from extra time to set.
- Make no-bake bars, brownies, or fudge
- Bake brownies or crusts and freeze them tightly wrapped
- Clear freezer space and label containers so nothing gets forgotten
- Take inventory of pantry staples so you’re not buying duplicates
If you have a quieter evening earlier in the week, this is a great time to use it. Getting these steps done early makes everything else feel manageable.
3–4 Days Before the Party
Now’s the time for desserts that need to rest in the fridge.
- Prepare cheesecakes, layered desserts, or traybakes
- Assemble desserts that improve with chilling time
- Store everything covered and clearly labeled
- Gather serving dishes, trays, and utensils so you’re not scrambling later
This is also a good moment to double-check how you’ll transport everything — especially if you’re bringing dessert somewhere else.
1–2 Days Before the Party
At this point, most of the work is already done.
- Add toppings or final layers
- Move frozen desserts to the fridge if they need to thaw
- Cut bars or brownies if you want them ready to serve
- Set aside napkins, serving spoons, and containers for transport
This is where planning pays off. Instead of baking, you’re just checking boxes.
Party Day
Dessert should be the least stressful part of the day.
- Add any last-minute garnishes
- Transfer desserts to serving dishes
- Pack items into coolers or carriers if traveling
- Take a breath — dessert is handled
You get to show up with something homemade, festive, and thoughtful — without feeling rushed or worn out.
Dessert Table Styling & Party Pairings
When it comes to setting up a St. Patrick’s Day dessert table, there’s no need to overthink it or buy anything new just for one day. Most of the time, the desserts you’ve already made are what people notice first — not whether your platters match.
A little intention goes a long way. The goal is to make things easy to grab, easy to serve, and comfortable for people to linger for a few minutes and come back for seconds.
Setting up the Dessert Table
When you’re choosing desserts for a St. Patrick’s Day table, balance matters more than quantity. A mix of rich, light, and easy-to-grab treats keeps the table interesting and helps your budget go further.
Here are a few simple ways to build a well-rounded dessert spread using the recipes in this post.
Option 1: The Easy Crowd-Pleaser Table
Great for work potlucks or family gatherings.
- A rich centerpiece like Bailey’s Cheesecake or No-Bake St. Patrick’s Day Cheesecake
- A lighter option such as Green Jello Parfaits or Pineapple Delights
- A grab-and-go treat like Mint Oreo Fudge or Chocolate Mint Brownies
Option 2: The Chocolate-Forward Table
Perfect if you know your crowd loves brownies and bars.
- Brownie Trifle or Bailey’s Irish Cream Brownies
- Chocolate Mint Nanaimo Bars for variety
- Mint Oreo Fudge cut into small pieces to stretch servings
Option 3: The No-Bake, Low-Stress Table
Ideal when time or oven space is limited.
- Grasshopper Pie or No-Bake Cheesecake
- Mint Oreo Fudge
- Pineapple Delights for a lighter contrast
Option 4: The Family-Friendly Table
Works well for school events or mixed-age gatherings.
- Chocolate Mint Brownies
- Green Jello Parfaits (easy portions for kids)
- Pineapple Delights or No-Bake Cheesecake
Each of these combinations gives guests choices without overwhelming the table — and keeps you from making more desserts than you actually need.
Easy Drink Pairings That Make Desserts Feel Complete
A few easy drink options are plenty to make dessert feel complete. Simple pairings that work well:
- Coffee or Irish coffee alongside brownies or cheesecake
- Milk or chocolate milk for kid-friendly desserts
- Mint tea or hot cocoa for evening gatherings
- A green punch or mocktail for visual impact
Still want a complete drink menu to go with your St. Patrick’s Day Desserts? Check out these green-themed options:
🍸
Boozy dessert drinks & cocktails (budget-friendly)
🥤
Green mocktails, smoothies & shakes (non-alcoholic)
Plan for How People Will Actually Serve Themselves
- Pre-slice bars and brownies so guests aren’t guessing portions
- Use small themed plates and paper napkins to encourage easy sampling and easy clean-up
- If space is tight, set out half the desserts and refill as needed
- For potlucks, individual portions or bars travel better than large plated desserts
Final Thoughts
St. Patrick’s Day can be simple but still be worth celebrating. Most years, it shows up right in the middle of busy schedules when there isn’t much room for extra effort or last-minute plans. Still, there’s something satisfying about showing up with a homemade dessert — something you planned for ahead of time.
Making desserts in advance takes the pressure off in a way you don’t fully appreciate until you’ve done it. When everything is already made and ready to go, the day itself feels calmer. You’re not rushing, not overspending, and not second-guessing whether you should have done something differently. You’re just packing things up and heading out the door.
Whether you make one dessert or a small spread for a St. Patrick’s Day get-together, planning ahead gives you flexibility. You can work around your schedule, stretch familiar ingredients, and still bring something festive.
In the end, dessert should add to the day, not take it over. A little planning leaves more space for the moments that matter most.


1 thought on “Make-ahead St. Patrick’s Day Desserts on a Budget”
Comments are closed.