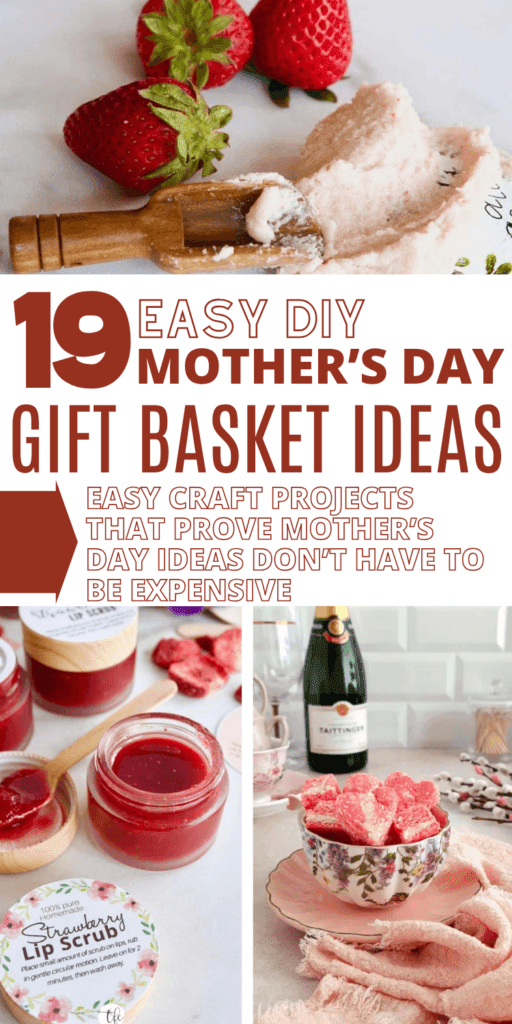
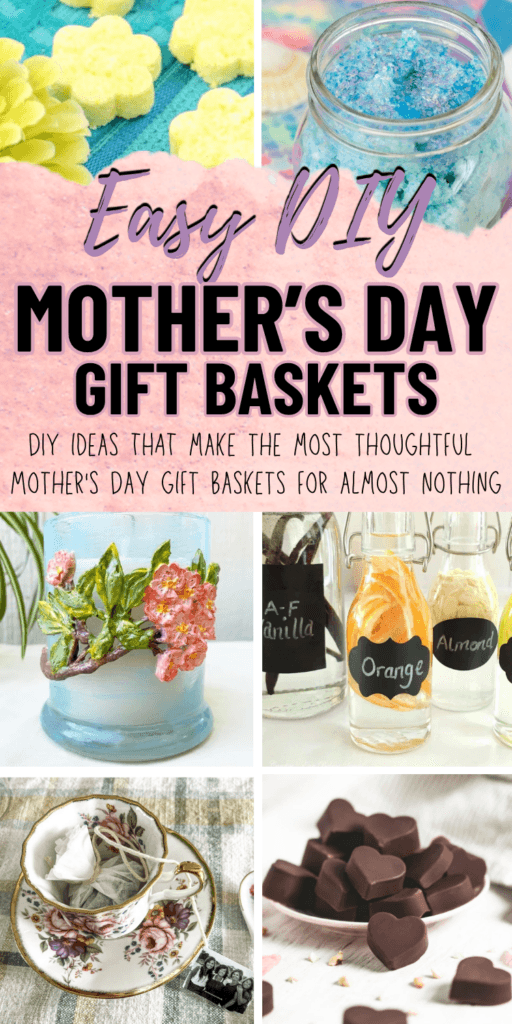
The basket was wrapped in cellophane, tied with a bow, and priced at $47. Inside: a travel-sized lotion she’d never use, a bar of soap that smelled like a hotel lobby, and two pieces of chocolate that probably came from a bin at the register. I stood there in that gift aisle for a solid two minutes before I put it back on the shelf and walked out.
Not because I didn’t want to spend money on her. Because I make things — and spending $47 on something I could do better for $12 felt like giving up. So I tracked down every DIY project worth making, rounded up in one place so you can build a basket she’ll actually love for a fraction of that price tag.
Why Homemade Beats Store-Bought
Pre-made gift baskets are priced for convenience and margin, not quality. What you’re paying for is the cellophane, the brand name on the tag, and the labor of someone else making a decision. When you build it yourself, every single item is a choice you made — and that comes through when she opens it.
There’s also a practical advantage that rarely gets mentioned: homemade items are almost always higher quality than what’s in those pre-wrapped sets. A batch of DIY sugar scrub made with coconut oil and real vanilla costs about $3 to make and outperforms the $14 drugstore version in every way. Homemade cappuccino mix, real extract, handmade soap — these are items she’ll use until they’re gone and then wonder where to get more. That’s the goal.
What to Use as Your Basket
You do not need to buy a basket. The container is part of the gift — and thrifted, repurposed, or Dollar Tree options frequently look better than the standard wicker oval anyway.
A wooden crate from the dollar section gives a farmhouse feel and doubles as a desk organizer afterward. A wide-mouth mason jar tied with a ribbon works beautifully for a single-theme basket — think scrubs, salts, and a lip balm tucked inside. A simple cloth tote bag means zero filler needed, everything just drops in, and she gets a reusable bag out of it. Oui yogurt jars cleaned and clustered together with twine make a charming mini-basket for smaller items like a homemade candle, a sugar scrub, and a set of plant pokes. If you have a shallow box or tin from a previous holiday, line it with a kitchen towel or cut tissue paper and it’s ready to go.
Whatever you use, size matters more than style. A container that’s slightly too big will look empty and sad. Go smaller than you think you need, pack it full, and it’ll look intentional.
✨ Transparency Matters
Some links in this post may be affiliate links. That means I may earn a small commission — including as an Amazon Associate — at no extra cost to you.
It exfoliates and moisturizes in one step, which means she’ll actually use it weekly instead of letting it collect dust on the bathroom shelf.
How long does it take from start to finish? Under 10 minutes, start to finish. No curing or setting time — jar it and it’s done.
How difficult is it — and what skills are needed? Completely beginner-friendly. The basic version is mix-and-done with a spoon; the whipped version just needs a hand mixer.
What will it cost me, and what do I likely already have? About $3–5 per jar. Sugar and coconut oil are likely already in your kitchen — the only potential purchase is a small glass jar and an essential oil.
How can I repurpose something I already have for this project? Any clean, wide-mouth glass jar with a lid works — an empty pasta sauce jar or an Oui yogurt jar cleaned up beautifully and costs nothing.
How can I package it to look special for Mom? Cut a circle of kraft paper or a scrap of fabric to cover the lid, tie with twine, and add a handwritten scent label. The Fresh Cooky also offers free printable labels directly on the post.
How can I adapt this to make it unique for my Mom? Swap the scent — lavender for the mom who loves calm, peppermint for a wake-up shower, vanilla for the baker. Use brown sugar for sensitive skin or coarse turbinado for a serious heel scrub.
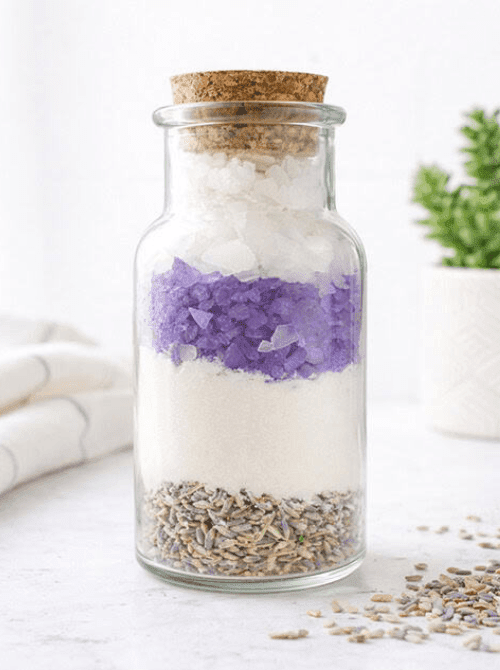
A jar of bath soak with real Epsom salt gives her something she’ll actually reach for after long, hard days — and it has a shelf life of up to two years, so there’s no pressure to use it quickly.
How long does it take from start to finish? About 10 minutes of active mixing with no curing time. Make it the same day you assemble the basket or weeks ahead — both work fine.
How difficult is it — and what skills are needed? Completely beginner-friendly — it’s Epsom salt, dried lavender, baking soda, and essential oil stirred together in a bowl. No special tools or techniques required.
What will it cost me, and what do I likely already have? Around $4–6 per jar. Epsom salt and baking soda are almost certainly already in your home; the only likely purchase is lavender essential oil and dried lavender buds.
How can I repurpose something I already have for this project? Any wide-mouth glass jar with a lid works perfectly — a cleaned-out pickle jar or spaghetti sauce jar is ideal and costs nothing.
How can I package it to look special for Mom? Fill a mason jar, place a square of purple or kraft fabric over the lid, and secure with twine. The lavender buds visible through the glass do the decorative work for you.
How can I adapt this to make it unique for my Mom? Swap lavender for eucalyptus essential oil for a more spa-like, clearing soak, or add dried rose petals instead of lavender buds for a romantic, floral version.
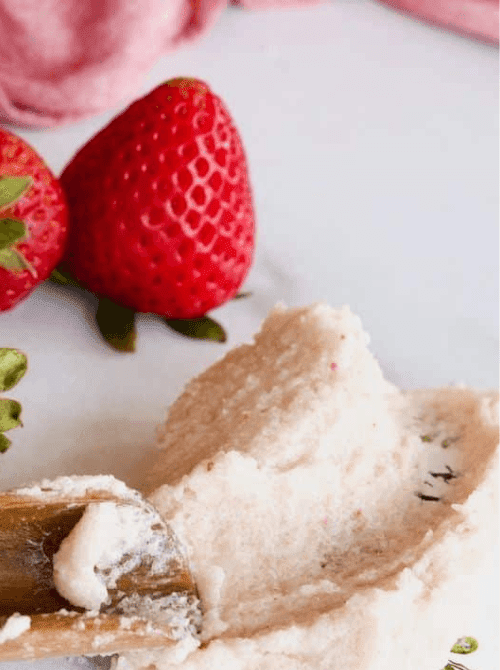
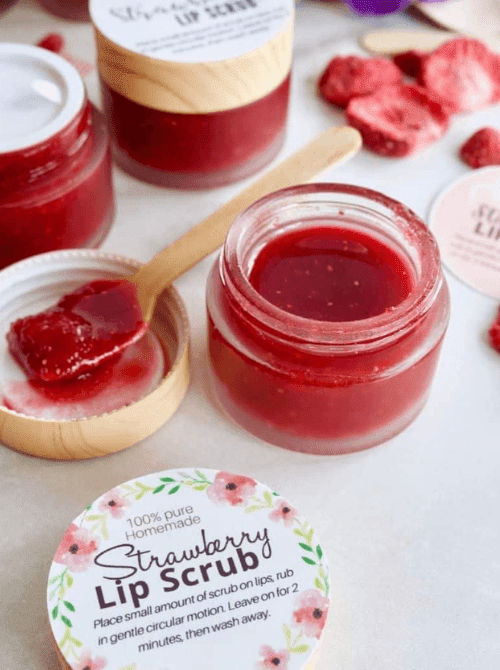
Chapped lips are universal, and a scrub that smells like fresh strawberries and costs $3 to make will outlast any store-bought version she’d buy for $12. It’s a no-brainer.
How long does it take from start to finish? About 10 minutes start to finish, including melting the coconut oil. No setting or curing time needed.
How difficult is it — and what skills are needed? Easy, with one small extra step — crushing freeze-dried strawberries into powder, which takes about 30 seconds in a blender or a zip-lock bag and a rolling pin.
What will it cost me, and what do I likely already have? Around $3–5 per pot. Sugar and coconut oil are likely already on hand; the main purchase is freeze-dried strawberries, which are easy to find near the dried fruit at most grocery stores.
How can I repurpose something I already have for this project? Small empty lip balm pots, cleaned-out travel cream containers, or even tiny jam jars all work well for packaging this scrub.
How can I package it to look special for Mom? A small 1–2 oz. pot with a handwritten label looks like something from a specialty beauty shop. The Fresh Cooky provides free printable labels in 1.5″ and 2″ round sizes directly on the post.
How can I adapt this to make it unique for my Mom? Swap the strawberry powder for freeze-dried raspberries or blueberries to change both the color and the scent — each version looks completely different in the jar.
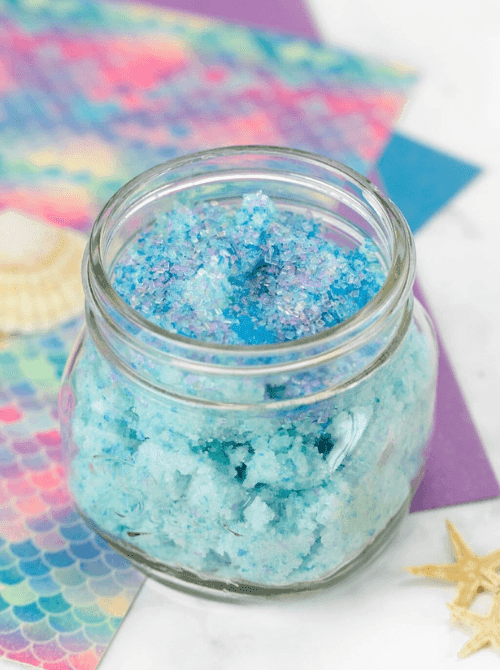
The swirling ocean colors make it look boutique-made, and no one needs to know it took five minutes and cost less than $4.
How long does it take from start to finish? About 5 minutes of active mixing — no drying, setting, or curing time required.
How difficult is it — and what skills are needed? As easy as it gets — stir sugar and coconut oil together, add a drop or two of food coloring, and spoon into a jar. No special tools or techniques needed.
What will it cost me, and what do I likely already have? Around $3–4 per jar. Sugar and coconut oil are pantry staples; the only potential purchase is blue or purple food coloring and optional sugar sprinkles, both available at the dollar store.
How can I repurpose something I already have for this project? Any wide-mouth glass jar works perfectly — a cleaned pasta sauce jar or small pickle jar shows off the swirling ocean colors beautifully.
How can I package it to look special for Mom? The blue and purple swirl does the visual work for you — just add a simple white label with a handwritten name and tuck it in the basket. A small seashell placed on top of the scrub before closing the lid adds a finishing touch for almost nothing.
How can I adapt this to make it unique for my Mom? Swap lavender essential oil for coconut extract to lean into a tropical beach scent, or use teal and green food coloring instead of blue and purple for a different ocean colorway entirely.
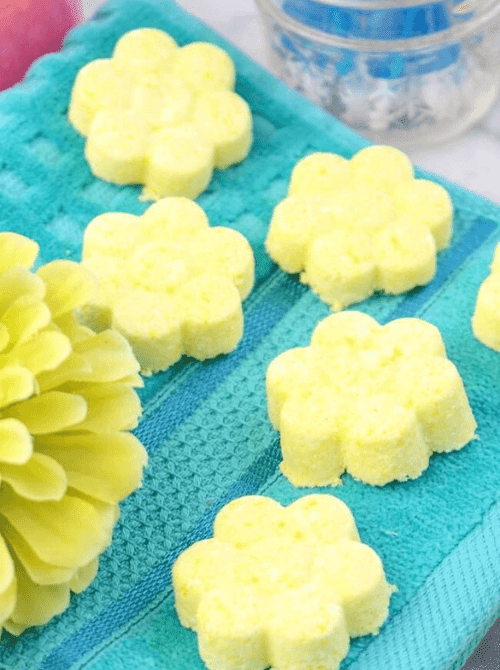
She gets an aromatherapy spa experience in a 10-minute shower, which is far more realistic for most moms than a long soak.
How long does it take from start to finish? About 15–20 minutes of active prep, plus a 2-hour freeze time before they’re ready to unmold and use or gift.
How difficult is it — and what skills are needed? Intermediate — the technique is simple but requires care. Adding moisture too quickly will activate the fizzing reaction early and ruin the batch, so slow and steady wins here.
What will it cost me, and what do I likely already have? Around $6–10 for a batch of 12+, which brings the per-steamer cost well under $1. Baking soda and cornstarch are likely already in your pantry; citric acid and essential oils are the main purchases.
How can I repurpose something I already have for this project? A silicone muffin pan or ice cube tray works perfectly as the mold — no special equipment needed if you already have either in your kitchen.
How can I package it to look special for Mom? Stack 3–4 steamers in a small cellophane bag tied with ribbon, or line a small box with tissue paper and nestle them inside. Add a handwritten card with scent notes and instructions for use.
How can I adapt this to make it unique for my Mom? The scent blend is where you personalize — lavender and chamomile for the mom who needs to decompress, peppermint and eucalyptus for the one who’s always fighting congestion, or citrus and bergamot for a morning energizer.
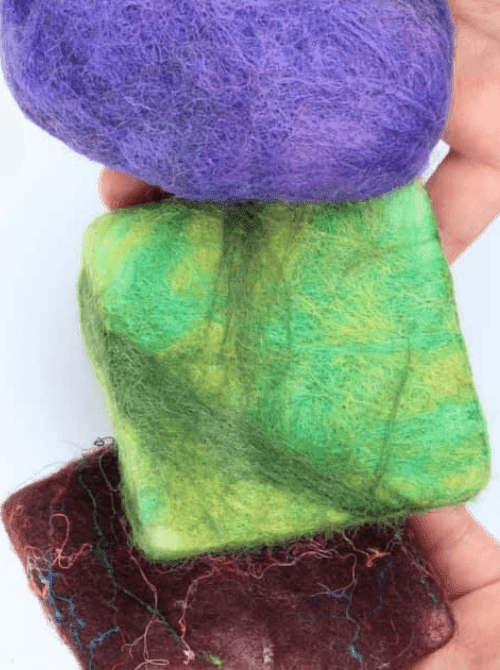
The wool coating makes the bar last significantly longer than unwrapped soap, so she gets more use out of your gift over time.
How long does it take from start to finish? About 20–30 minutes of hands-on felting per bar, plus drying time of 1–2 days before gifting.
How difficult is it — and what skills are needed? Beginner-friendly despite looking impressive — you’re wrapping wool around a bar of soap and rubbing it with hot water until the fibers bond. No stitching, no pattern, no special tools required.
What will it cost me, and what do I likely already have? Around $5–8 per bar depending on the soap and wool you choose. A small bundle of wool roving goes a long way and can be found inexpensively on Etsy or at craft stores.
How can I repurpose something I already have for this project? An old nylon stocking or piece of mesh fabric from a produce bag works as the wrapping tool to hold the wool in place while you felt — no need to buy mesh separately.
How can I package it to look special for Mom? Place the finished bar on a small square of kraft paper, wrap it loosely, and tie with twine. The textured wool surface and handmade look need almost no additional decoration to feel intentional.
How can I adapt this to make it unique for my Mom? Choose wool colors that match her bathroom palette, or use two complementary colors in stripes or swirls. You can also needle-felt a simple initial or small shape into the surface once it’s dry for a truly personalized touch.
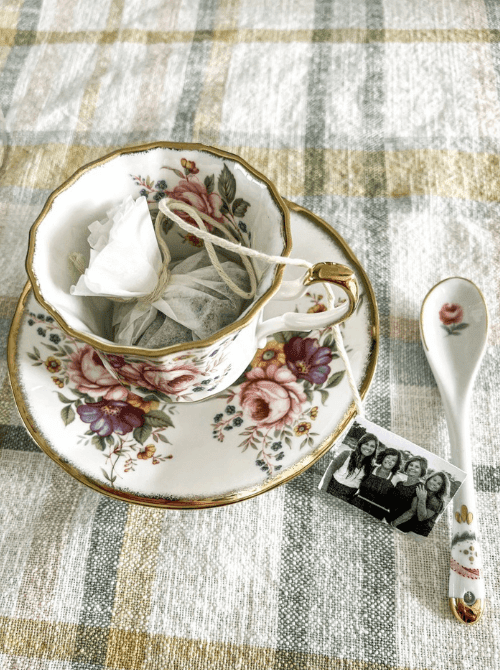
The photo tag is what separates this from every other homemade tea bag tutorial — it turns a simple gift into a keepsake she’ll think about every time she makes a cup.
How long does it take from start to finish? About 5 minutes per bag once you find your rhythm — a set of 6–8 bags takes roughly 30 minutes total, including cutting tags and tying twine.
How difficult is it — and what skills are needed? No skills required. This is a fold-and-staple project using coffee filters, loose leaf tea, twine, and small paper tags — nothing that needs practice to get right.
What will it cost me, and what do I likely already have? Under $5 for a set of 8–10 bags. Coffee filters and a stapler are almost certainly already on hand; the only purchase is loose leaf tea, which you can find inexpensively in bulk at most grocery or health food stores.
How can I repurpose something I already have for this project? Old photos printed on regular paper, scraps of cardstock, or pages from an old book all make beautiful tea bag tags — no craft store run needed.
How can I package it to look special for Mom? Arrange the finished bags in a small kraft paper box or stack them in a wide-mouth mason jar tied with ribbon. The handmade tags visible through the glass make it look like something from a specialty tea shop.
How can I adapt this to make it unique for my Mom? Swap the tea type to match her preferences — chamomile for the mom who needs to wind down, peppermint for the one who drinks it after dinner, or an herbal blend she’s never tried. Write a short personal message on the tag instead of using a photo for a more sentimental touch.
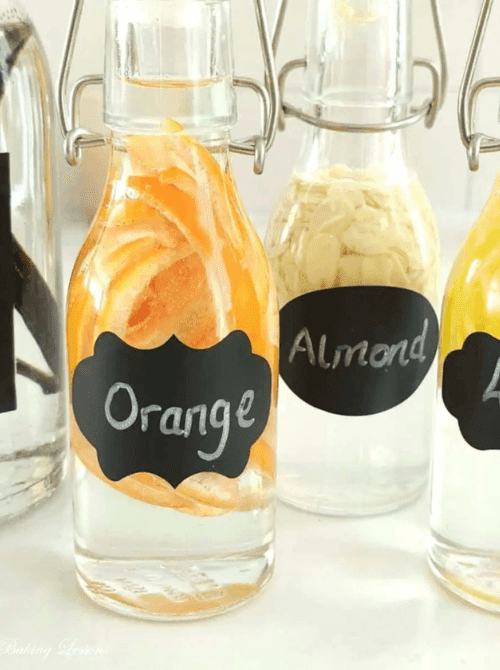
Homemade extracts improve with age, and every batch of cookies or cake she bakes with them will come back to this gift.
How long does it take from start to finish? About 10 minutes of active prep, then 8 weeks of hands-off steeping time — shake the jar every few days for the first two weeks, then weekly after that.
How difficult is it — and what skills are needed? No skill needed at all — it’s measuring, combining, and waiting. The only thing to get right is using food-grade vegetable glycerine rather than alcohol, which is exactly what this recipe walks you through.
What will it cost me, and what do I likely already have? Around $8–12 for a set of three small bottles. Vanilla beans, citrus peel, and almonds are the flavoring agents; the main purchase is food-grade vegetable glycerine, which is available online and lasts for many batches.
How can I repurpose something I already have for this project? Small glass spice jars, old jam jars, or any clean narrow-necked bottle work perfectly — amber glass is ideal but clear works fine too.
How can I package it to look special for Mom? A set of three small bottles labeled with the flavor name and date, grouped together in a small box with tissue paper, looks like something from a specialty kitchen shop. A handwritten card noting what each flavor pairs well with makes it feel complete.
How can I adapt this to make it unique for my Mom? Make the flavors she actually uses — if she bakes a lot of lemon desserts, lean into citrus. The recipe also works for mint, cinnamon, and coconut, so you can build a custom set around her specific baking style.
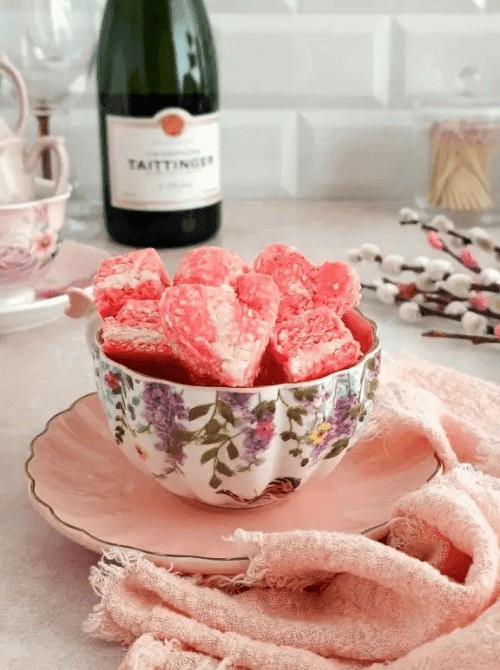
The pink and white layers look like something from a confectionery shop window, and nobody needs to know it took ten minutes and costs less than a coffee.
How long does it take from start to finish? About 10 minutes of mixing, then 2 hours in the fridge to set before slicing. Total hands-on time is minimal.
How difficult is it — and what skills are needed? Three ingredients, no baking, no candy thermometer — just mix, press into a tin, chill, and slice. The only downfall may be food coloring staining your hands, so gloves are recommended.
What will it cost me, and what do I likely already have? Around $5–7 for a batch of roughly 45 squares. Sweetened condensed milk and powdered sugar are pantry-accessible; desiccated coconut is the one item to pick up, widely available at most grocery stores.
How can I repurpose something I already have for this project? Any square or rectangular baking dish, plastic container, or even a loaf pan lined with parchment paper works perfectly as the setting tin.
How can I package it to look special for Mom? Arrange the pink and white squares in a small box lined with parchment, or stack them in a clear cellophane bag tied with a pink ribbon. The two-tone color does all the visual work without any additional decoration.
How can I adapt this to make it unique for my Mom? Swap the pink food coloring for lavender, blue, or her favorite color to make it feel personal rather than generic. You can also dip finished squares in melted dark chocolate for an elevated version that takes just a few extra minutes.
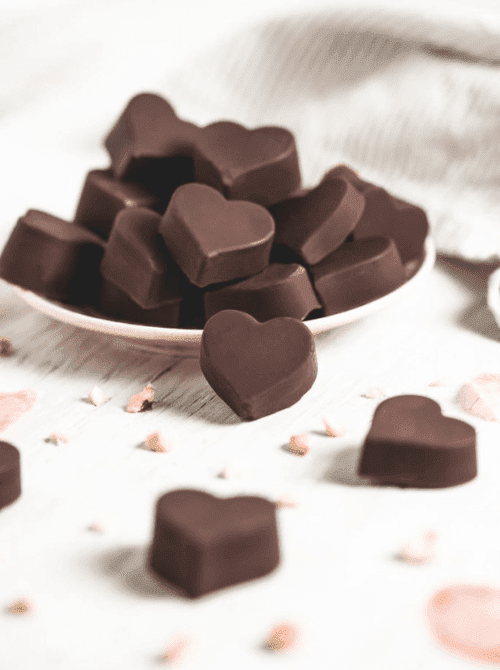
Refined-sugar-free and dairy-free but rich enough that she won’t believe it, which makes it the right choice for the mom who loves chocolate but tries to eat well.
How long does it take from start to finish? About 45–60 minutes of active work spread across two stages — making the shell and filling separately — plus at least 1 hour of freezer time between steps.
How difficult is it — and what skills are needed? Intermediate. The technique involves working with melted cacao butter and layering chocolate in molds, which requires a little patience and moving quickly before the chocolate sets. A high-speed blender is needed for the filling.
What will it cost me, and what do I likely already have? Around $12–18 for a batch, depending on whether you already have cacao butter and maple syrup. The ingredients skew toward specialty health food items, but the recipe makes enough truffles to fill a generous gift box.
How can I repurpose something I already have for this project? An ice cube tray works as a mold if you don’t have candy molds — heart or round shapes both produce beautiful results with the same method.
How can I package it to look special for Mom? Line a small box with parchment paper and arrange the truffles in a single layer. A few of these in a kraft gift box tied with twine look indistinguishable from a boutique chocolate shop — and the ingredients story (no dairy, no refined sugar) is a selling point worth writing on the tag.
How can I adapt this to make it unique for my Mom? The leftover hazelnut filling makes a spreadable chocolate hazelnut butter she can use on toast — include a small jar of it alongside the truffles to turn one recipe into two gifts.
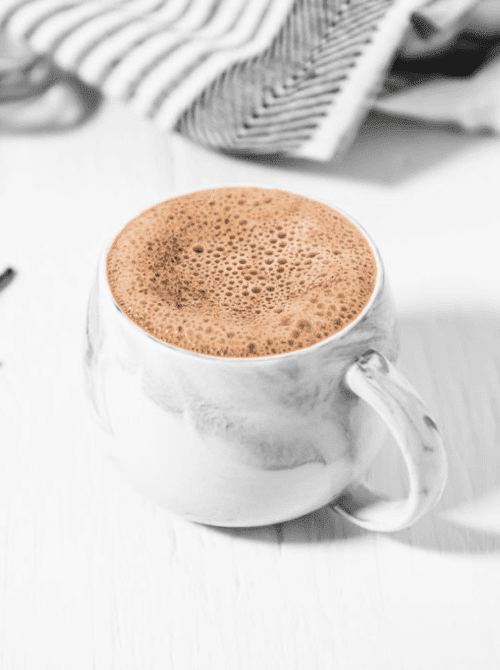
It’s the only item in the basket she can reach for every single morning to start her day. She’ll think of you first thing each morning.
How long does it take from start to finish? Under 10 minutes — measure, blend, and jar. No cooking or steeping required.
How difficult is it — and what skills are needed? About as simple as it gets. Combine five dry ingredients in a blender or bowl, mix until smooth, and transfer to a jar. A small smoothie blender gives the best results but isn’t required.
What will it cost me, and what do I likely already have? Around $8–12 for a jar, depending on whether you already have cacao powder and coconut sugar. The specialty ingredient is roasted dandelion root powder, which is the caffeine-free coffee substitute base — available online or at health food stores.
How can I repurpose something I already have for this project? Any clean glass jar with a tight-fitting lid works beautifully — a wide-mouth mason jar is ideal and keeps the powder fresh for 3–6 months.
How can I package it to look special for Mom? Fill a mason jar, add a simple kraft label with the name and a “just add hot water or warm milk” instruction, and tie with twine. It looks like a premium coffee shop product and costs a fraction of one.
How can I adapt this to make it unique for my Mom? Swap the dandelion root for organic instant coffee if she prefers a caffeinated version, or add a pinch of cinnamon or cardamom for a spiced twist. The recipe also works as a baking ingredient — note that on the label for a bonus tip she’ll actually use.
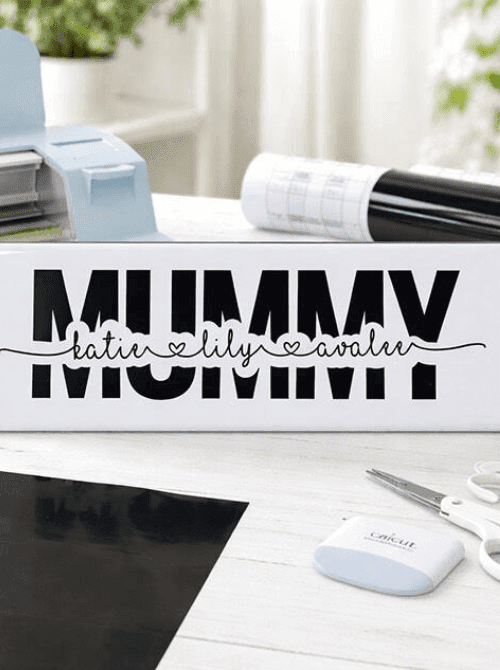
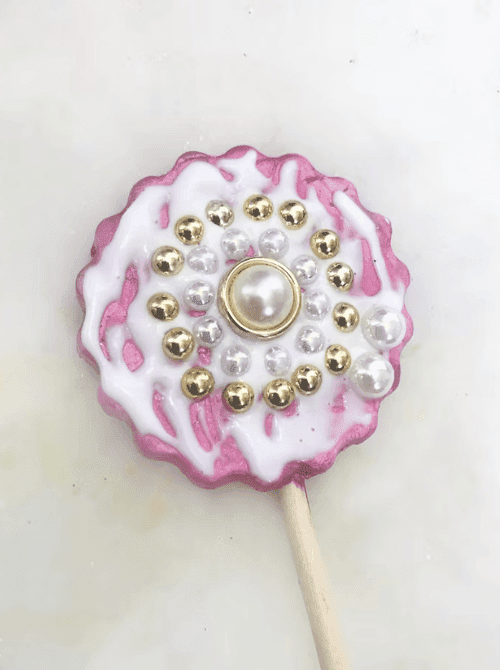
A personalized tile with her name or a meaningful word looks custom-made and costs less than $5 total.
How long does it take from start to finish? Under 30 minutes once your design is set up in Cricut Design Space. Most of that time is cutting and applying the vinyl — the design setup takes the longest for first-timers.
How difficult is it — and what skills are needed? Intermediate — you need a Cricut machine and basic familiarity with Design Space to create the knockout text effect. The post walks through each step, but this is not a no-machine project. Weeding the small accent text takes patience.
What will it cost me, and what do I likely already have? Around $3–5 per tile. A ceramic tile from the flooring section of any home improvement store costs $1–2; permanent adhesive vinyl and transfer tape are the only other purchases, and both go a long way across multiple tiles.
How can I repurpose something I already have for this project? Leftover vinyl scraps from other Cricut projects work perfectly here — the tile is small enough that even short remnants cover the design.
How can I package it to look special for Mom? Stand the finished tile upright in a small plate holder or prop it against a jar in the basket so the design is visible when she opens it. It needs no wrapping — the tile itself is the presentation.
How can I adapt this to make it unique for my Mom? The word is entirely up to you — MOM, her name, a word that means something specific to her, or even a short phrase. Change the accent font to something in her style, from clean and modern to flowing script.
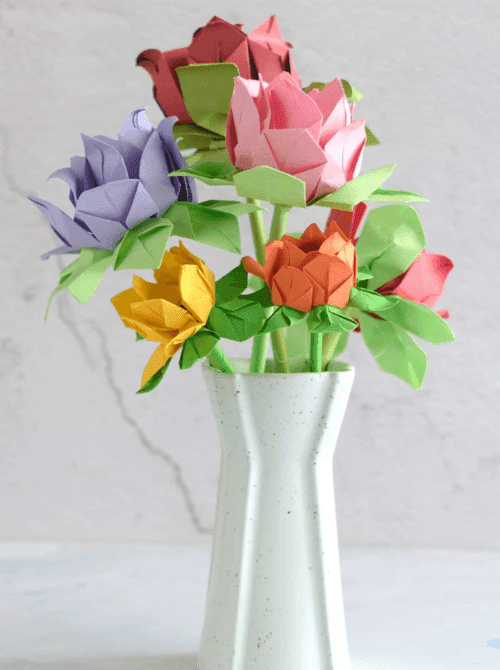
Unlike every other flower, this one never wilts — she can keep it on her shelf for years.
How long does it take from start to finish? About 15–20 minutes for your first rose; under 10 minutes once you’ve made one or two and the folding sequence is in your hands.
How difficult is it — and what skills are needed? Beginner-friendly with a small learning curve on the first attempt. The post recommends 80–100 GSM paper — standard printer paper or lightweight cardstock — and the steps are clearly photo-guided. No tools required beyond scissors and optional glue.
What will it cost me, and what do I likely already have? Under $1 per rose. Standard printer paper or craft paper in any color is all you need — no specialty materials required whatsoever.
How can I repurpose something I already have for this project? Pages from an old book, sheet music, maps, or wrapping paper scraps all make stunning roses and give each one a completely different look and personality.
How can I package it to look special for Mom? Tuck a small bouquet of 3–5 roses into the basket as both filler and gift — they add height, color, and a handmade centerpiece element without any extra packaging needed.
How can I adapt this to make it unique for my Mom? Match the paper color to her favorite flower or use her favorite colors. A rose made from a page of her favorite book, or from a letter you’ve written her, becomes something completely different from a craft project.
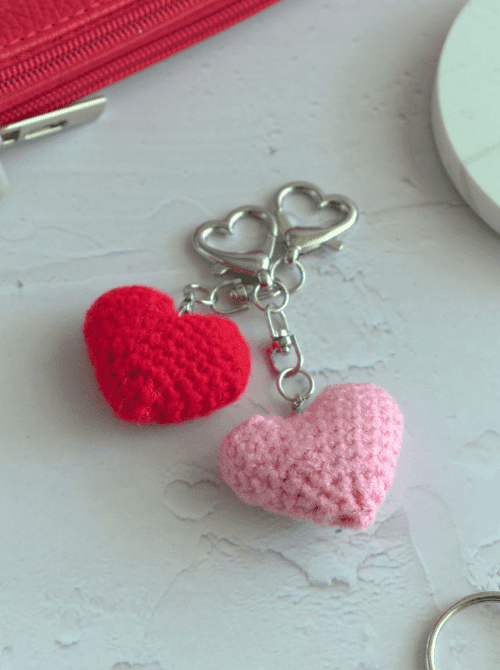
A handmade heart on her keychain is a small, constant reminder that someone took the time to make something just for her.
How long does it take from start to finish? Under 30 minutes per keychain once you’re comfortable with the basic stitches — fast enough to make a few in an afternoon.
How difficult is it — and what skills are needed? Beginner-friendly if you already know basic crochet stitches. The pattern uses single crochet and a simple decrease — if you’ve crocheted before, this is approachable. If you’ve never crocheted at all, this is a good first small project but expect a short learning curve.
What will it cost me, and what do I likely already have? Nearly free if you crochet. Each keychain uses about 3 grams of yarn — a scrap too small for most projects — plus a keychain ring that costs pennies from a craft or dollar store.
How can I repurpose something I already have for this project? Any leftover yarn from a previous project works perfectly — this is genuinely one of the best uses for the small scraps that are too short for anything else.
How can I package it to look special for Mom? Attach it to a small tag with her name or a short note before placing it in the basket. It’s small enough to tuck into a corner of the basket, but personal enough to be its own gift.
How can I adapt this to make it unique for my Mom? Choose yarn in her favorite color, or make two hearts in complementary colors and attach them to the same ring. Cotton yarn gives a tidy, durable finish that holds up well on keys and bags.
Every time she waters her houseplants, she’ll see something you made.
How long does it take from start to finish? About 20–30 minutes of active work, plus overnight drying time for the air dry clay before painting and adding pearls.
How difficult is it — and what skills are needed? Completely beginner-friendly. You roll out clay, cut shapes with a cookie cutter, let it dry, and glue on flat-back pearls or rhinestones — no clay sculpting experience required.
What will it cost me, and what do I likely already have? Around $4–7 for a set of 3–4 pokes. Air dry clay, a cookie cutter, and a wooden dowel are all you need; flat-back pearls or rhinestones are the finishing touch and cost very little in small packs.
How can I repurpose something I already have for this project? Any cookie cutter shape from your kitchen doubles as the mold — flower, heart, star, or butterfly all work perfectly and save you a craft store trip.
How can I package it to look special for Mom? Bundle 3–4 finished pokes together with a small rubber band or twine and tuck them upright in the basket. They look like something from a boutique plant shop and need no further wrapping.
How can I adapt this to make it unique for my Mom? Match the shape and color to her plants or her décor — soft florals for the mom with lots of houseplants, or bold geometric shapes for the one with a more modern aesthetic. You can also write her initial into the clay with a toothpick before it dries for an extra personal touch.
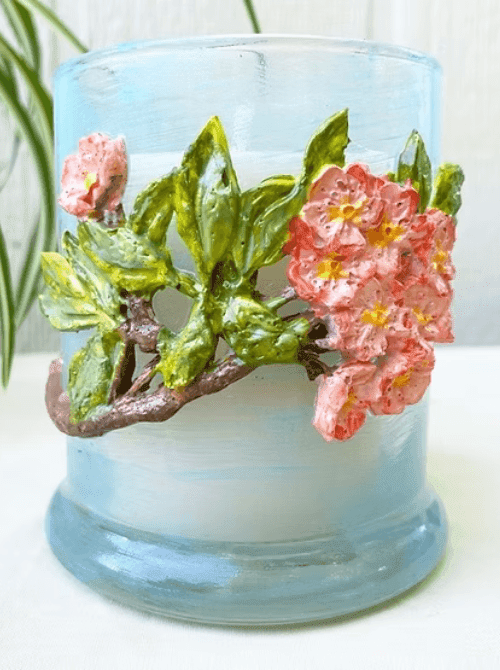
Once the candle is gone, the decorated glass stays on her shelf, which means your gift keeps showing up long after Mother’s Day is over.
How long does it take from start to finish? About 20–30 minutes of active crafting, plus drying time depending on the decorating method used. Most techniques — Mod Podge, paint, tissue paper — are dry within an hour or two.
How difficult is it — and what skills are needed? Beginner-friendly. The basic technique involves decorating a glass jar or votive with paint, tissue paper, or adhesive embellishments — nothing that requires prior experience to get right.
What will it cost me, and what do I likely already have? Around $2–5 per holder. The glass itself is often free from your recycling bin; Mod Podge or craft paint and a brush are the only purchases, and both are dollar store finds.
How can I repurpose something I already have for this project? A cleaned pasta sauce jar, Oui yogurt jar, or any glass jar with a wide opening is the perfect base — the recycled glass often has more character than anything you’d buy.
How can I package it to look special for Mom? Drop a tea light inside before placing it in the basket so she can immediately visualize how it will look lit. The glow through a decorated jar is the best advertisement for the gift itself.
How can I adapt this to make it unique for my Mom? Match the color palette or motif to her home décor — pressed flowers or tissue paper in her favorite colors, or a paint technique that fits her style from rustic to modern.
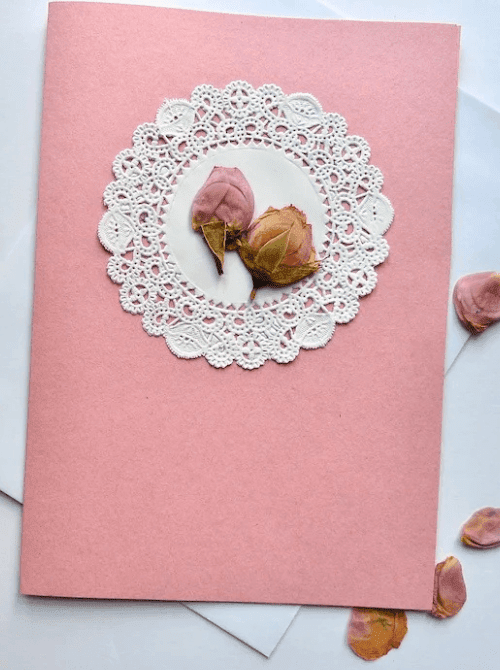
A pressed flower from your garden carries a meaning that no store-bought card ever could, and it takes almost nothing to make.
How long does it take from start to finish? About 10 minutes of active assembly — but plan ahead, because pressing the flowers first takes up to 4 weeks using the book method. If you’re short on time, the post also covers a faster iron method that can finish them in minutes.
How difficult is it — and what skills are needed? Completely beginner-friendly once your flowers are pressed. The assembly is simply arranging dried flowers on a folded card and gluing them down — no special tools or techniques required.
What will it cost me, and what do I likely already have? Nearly free if you have flowers in your garden. The only purchases needed are cardstock or blank cards and a small bottle of craft glue — both dollar store finds. Fresh or garden flowers, heavy books, and white absorbent paper are likely already on hand.
How can I repurpose something I already have for this project? Any heavy books from your shelf work perfectly as a flower press — just place the flowers between pieces of parchment paper or plain printer paper before pressing to prevent staining.
How can I package it to look special for Mom? Slip the finished card into a simple kraft envelope tied with twine and tuck it against the front of the basket so it’s the first thing she sees. The card is its own packaging.
How can I adapt this to make it unique for my Mom? Press flowers from your own garden — or hers — for a card that has a story behind it. Add calligraphy, a handwritten quote, or small ribbon accents if you want to dress it up further.
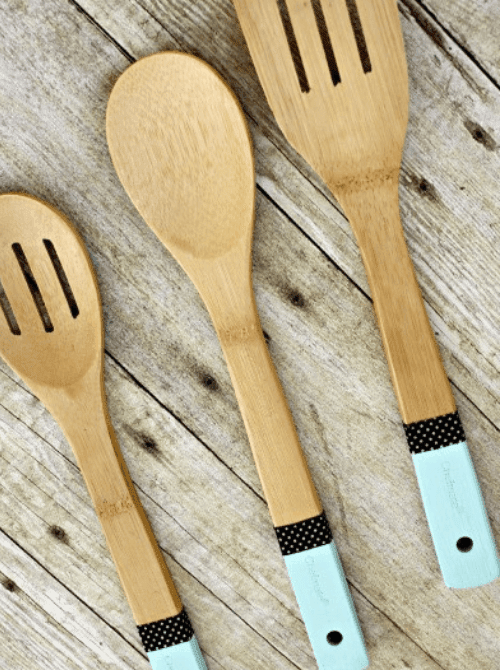
She’ll use these utensils every time she cooks, which means your handmade gift shows up on her counter every single day rather than sitting on a shelf.
How long does it take from start to finish? About 20–30 minutes including paint drying time — this is one of the fastest projects in the entire roundup.
How difficult is it — and what skills are needed? Zero skill required. You dip the handles of wooden utensils in craft paint, let them dry, add a strip of washi or fabric tape at the color line, and that’s it. No brushwork, no steady hand needed.
What will it cost me, and what do I likely already have? Around $4–7 for a set of three. A three-pack of wooden utensils runs $2–4 at Target or the dollar section; a small bottle of craft paint and washi tape are likely already in your craft supplies.
How can I repurpose something I already have for this project? Individual wooden spoons, spatulas, or bamboo utensils from your own kitchen drawer work just as well — no need to buy a matching set if you already have extras.
How can I package it to look special for Mom? Bundle the finished utensils together with a piece of twine and attach the free printable gift tag from the post. Stand them upright in a small jar or vase in the basket so the colored handles are visible.
How can I adapt this to make it unique for my Mom? Match the paint color to her kitchen palette — soft sage for a farmhouse kitchen, navy for a classic look, or a bold terracotta for the mom who loves color. The post also includes a free downloadable gift tag to print and attach.
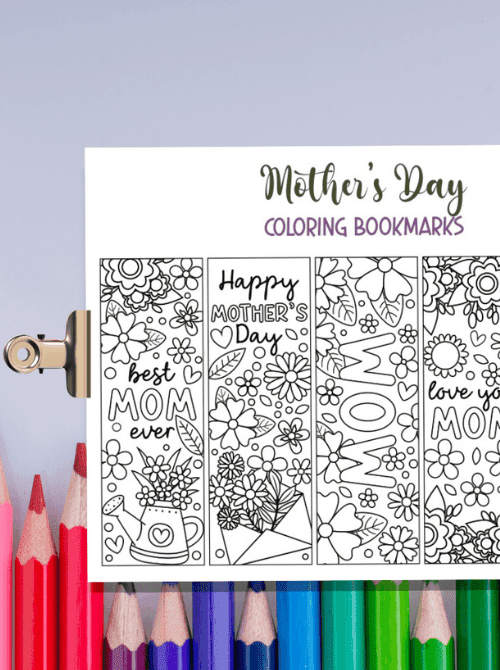
Nearly free, immediately personal once colored, and practical enough that she’ll actually use it every time she sits down with a book.
How long does it take from start to finish? About 15–20 minutes total — download, print, color, cut, and optionally add a ribbon tassel. This is a same-day project with no prep time.
How difficult is it — and what skills are needed? No craft skills needed at all. Print on cardstock, color with whatever you have — markers, colored pencils, crayons — cut out, and done. The post includes five different floral designs to choose from.
What will it cost me, and what do I likely already have? Essentially free. The printable is free to download; the only cost is a sheet or two of white cardstock and whatever coloring supplies you already own.
How can I repurpose something I already have for this project? A hole punch and a scrap of ribbon or twine from any previous project turns a flat bookmark into a finished gift — no special supplies needed for the tassel finish.
How can I package it to look special for Mom? Tuck a colored set of bookmarks inside her favorite book, or fan them out and tie them together with a ribbon before placing them in the basket. Laminating them first adds a polished, durable finish that makes them feel like a purchased product.
How can I adapt this to make it unique for my Mom? Color each bookmark in a different palette to create a coordinated set, or choose the design that best matches her personality — the “Best Mom Ever” watering can design for the gardener, the bouquet design for the one who loves flowers. Adding her name in fine-tip marker before gifting takes 30 seconds and makes them unmistakably hers.
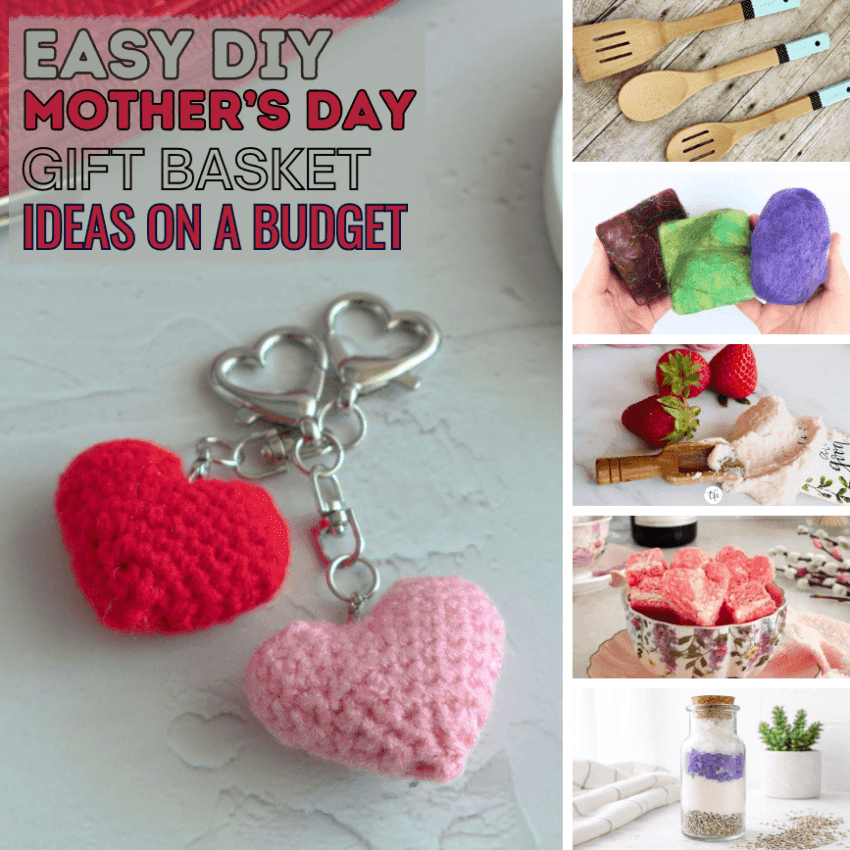
Themed Gift Basket Ideas
A theme is what separates a basket that looks curated from one that looks like a last-minute grab. These combinations pair the DIY projects from this roundup with a handful of inexpensive store-bought additions — nothing over a couple of dollars — so the basket looks full and put-together without doubling your budget.
The Slow Morning BasketFor the mom who deserves an unhurried Tuesday.
Homemade French vanilla cappuccino mix in a labeled jar
DIY tea bags tied with twine
Small homemade hazelnut truffles wrapped in parchment and closed with a sticker
Dollar Tree journal or notepad
Single taper candle
Container: cloth tote or handled wicker mini-basket
Approximate cost: $10–14
The Garden Lover BasketFor the mom whose windowsill is already crowded.
DIY plant pokes made from wooden dowels and polymer clay
Small packet of heirloom flower seeds from the dollar section
Homemade glass candle holder (doubles as a small planter once the candle is gone)
Handwritten plant care card for her favorite plant
Container: small terracotta pot or wooden seed flat from the dollar store
Approximate cost: $8–12
The Rainy Day Reading BasketFor the mom who always has a book going.
Homemade sugar scrub for her hands
Mother’s Day coloring bookmarks as a set
Jar of homemade vanilla extract with a notecard suggesting it for weekend baking
Dollar Tree paperback or bookmark set
Small bag of cocoa mix or tea
Container: fabric-lined shoebox or small crate
Approximate cost: $9–13
The Pressed Flowers & Pretty Things BasketFor the mom who likes her space just so.
Pressed flower card set upright as the centerpiece
Homemade glass candle holder
Paper rose
Homemade lip scrub in a jar with a floral label
Dried lavender or baby’s breath as filler
Container: shallow gift box lined with white tissue
Approximate cost: $10–15
The Kitchen Tinkerer BasketFor the mom who experiments and collects ingredients.
Homemade alcohol-free extracts in 2–3 flavors (vanilla, orange, almond) in small labeled glass jars
Homemade coconut ice wrapped in parchment
Color-dipped wooden utensils as the functional anchor piece
Dollar Tree recipe card set or small blank index card book
Container: small wooden crate or vintage-style tin
Approximate cost: $11–16
The “Treat Yourself Tonight” BasketFor the mom who keeps putting herself last.
Homemade shower steamers
Homemade sugar scrub
Jar of lavender bath soak
Dollar Tree bath sponge or loofah
Handmade inspirational quote plaque for the bathroom shelf
Container: small basket or handled tin lined with a washcloth she can keep
Approximate cost: $12–16
Final Thoughts
The $47 basket is still sitting on that shelf somewhere. Meanwhile, everything in this post can be made over a weekend — most of it in an afternoon — and will genuinely outperform it. Start with one basket theme, gather your materials, and build it out from there. If you’re working with a tight timeline, the bath basket comes together the fastest and ships well if you’re mailing it. The keepsake basket takes a little more lead time but has a longer emotional shelf life.
Pick the mom you’re making it for, pick the theme that fits her, and go make something she’ll actually use.
To provide the best experiences, we use technologies like cookies to store and/or access device information. Consenting to these technologies will allow us to process data such as browsing behavior or unique IDs on this site. Not consenting or withdrawing consent, may adversely affect certain features and functions.
Functional
Always active
The technical storage or access is strictly necessary for the legitimate purpose of enabling the use of a specific service explicitly requested by the subscriber or user, or for the sole purpose of carrying out the transmission of a communication over an electronic communications network.
Preferences
The technical storage or access is necessary for the legitimate purpose of storing preferences that are not requested by the subscriber or user.
Statistics
The technical storage or access that is used exclusively for statistical purposes.The technical storage or access that is used exclusively for anonymous statistical purposes. Without a subpoena, voluntary compliance on the part of your Internet Service Provider, or additional records from a third party, information stored or retrieved for this purpose alone cannot usually be used to identify you.
Marketing
The technical storage or access is required to create user profiles to send advertising, or to track the user on a website or across several websites for similar marketing purposes.