
Every February it starts the same way. You run into the store for one thing and walk out with a buggy full of things you don’t need or you’ll never use. It adds up fast, and before you know it Valentine’s feels way more expensive than it ever should.
This year I’m determined to change that. I’m focusing on Valentine’s DIY crafts that can be made on a Dollar Tree budget, using basics you probably already have tucked away from past projects. Most of the time it’s just a matter of digging into your craft stash. Pull out the hot glue gun, grab some scissors, and you’ve got an evening project that doesn’t require a big shopping trip.
These are the crafts you actually end up finishing. — made at the kitchen table after dinner or while kids are coloring beside you. They turn everyday supplies into home décor, classroom projects, and small handmade gifts, and there’s something really satisfying about seeing a few Dollar Tree finds become something you’re actually proud to set out or give away.
Read my full disclosure here if you’d like the details.
PIN IT FOR LATER TO YOUR FAVORITE PINTEREST BOARD

Dollar Tree Shopping List
One of the easiest ways to overspend on craft projects is making five separate trips for “just one more thing.” I try to keep a small Dollar Tree craft closet stocked with basic supplies so I’m always ready to start a project without another store run.
To make that easier for you, I’ve turned my go-to stash into a simple shopping list you can keep in your bag or pull up on your phone while you shop. These are the everyday basics that cover most Valentine’s DIY crafts and save you money in the long run.
👉 Download the free Dollar Tree Craft Supply Closet Shopping List (PDF)
- Hot glue sticks
- Tacky glue
- Glue dots or adhesive squares
- Mod Podge or clear-dry craft glue
- Double-sided tape
- Clear spray sealer (optional for glitter or paper projects)
- Foam board
- Poster board
- Cardstock
- Construction paper
- Coffee filters
- Paper plates
- Picture frames
- Mini chalkboards or signs
- Mason jars or plastic jars
- Wood shapes and plaques
- Mini easels
- Plastic trays or serving plates (great for table décor)
- Craft paint (pink, red, white, black)
- Paint brushes & foam brushes
- Wired ribbon & twine
- Faux florals or Valentine picks
- Stickers, foam hearts, gems, or sequins
- Pipe cleaners
- Pom-poms
- Googly eyes
- Washable markers & crayons
- Stickers
My Best Crafting Hacks
If you’ve ever finished a craft and thought, this would look so good if it didn’t scream dollar store, these little upgrades are my best hacks to make your project look more professional. They cost next to nothing, but they completely change the finished look.
- Paint fixes everything
Most Dollar Tree wood, foam, and plastic pieces look better with one quick coat of craft paint. Matte black, soft white, or muted pink tones instantly tone down shiny finishes. For wood signs, a light dry-brush with white paint gives that soft farmhouse look without needing new supplies.
- Swap the ribbon
The ribbon in the Valentine aisle can feel a little loud. Head to the basic craft section instead and grab neutral twine, wired ribbon, or burlap styles. Even a simple heart wreath feels more intentional with the right ribbon.
- Tone down the sparkle
If glitter is shedding everywhere, brush on a thin layer of Mod Podge or clear-dry glue and let it cure overnight. It keeps your table from looking like a craft explosion and makes pieces last longer in storage.
- Mix materials for a “not-from-Dollar-Tree” look
Layer paper over wood, tie twine around jars, or glue foam hearts onto painted frames. Mixing textures — paper, ribbon, wood, paint — keeps crafts from looking flat and store-bought.
- Sand after painting, not before
Lightly scuffing corners after paint dries exposes the original wood or MDF underneath. It creates natural wear instead of that fake “distressed” look.
- Use coffee as stain
Brew strong coffee, dip a paper towel in it, and wipe over wood or paper pieces. It instantly tones down bright white foam board and gives paper crafts a warm, aged look. Alternatively you could use leftover grounds, boil to release more color, and strain. Then follow the same instructions.
- Glue “inside the seam,” not the edge
Instead of running hot glue along the outer edge, glue about ¼” inward and press pieces together. It keeps shiny glue from bleeding through and ruining the front.
- Cut with a razor, not scissors
Dollar Tree foam board and thin wood look cleaner when trimmed with a craft knife and ruler instead of scissors. Straighter edges alone make things feel more expensive.
- Iron wrinkled ribbon and fabric
Ten seconds with a warm iron completely changes the vibe of Dollar Tree ribbon and fabric strips.
- Flip the piece over
So many Dollar Tree signs are ugly on the front and perfect on the back. Paint the backside, add your own design, and suddenly it doesn’t look mass-produced.
If you’re hosting friends for a Galentine’s craft night, don’t forget the drinks! My go-to Galentine’s Mocktails are easy, inexpensive, and perfect for a pink-and-red craft table.
Home Decor Valentine’s DIY Crafts
- How much does this craft usually cost to make?
About $3–$6 per set. - What should I grab at Dollar Tree for this project — and how many of each?
Mini wood pallets or tiles, craft paint, stickers or stencils, sealer. - How long does it realistically take from start to finish?
30–45 minutes including drying. - How easy is it, really?
Easy but messy — adults should handle sealing. - What makes this one stand out from the rest?
They’re functional, not just decorative. - How can I make it look more expensive?
Use muted paint colors and matte sealer. - What can I swap in if Dollar Tree is out of something?
Use ceramic tiles or scrap wood.
Quick Callouts
- ✴️Makes crafting practical, not just pretty
- ✴️Functional gift people actually use
- ✴️Perfect for hostess or teacher gifts
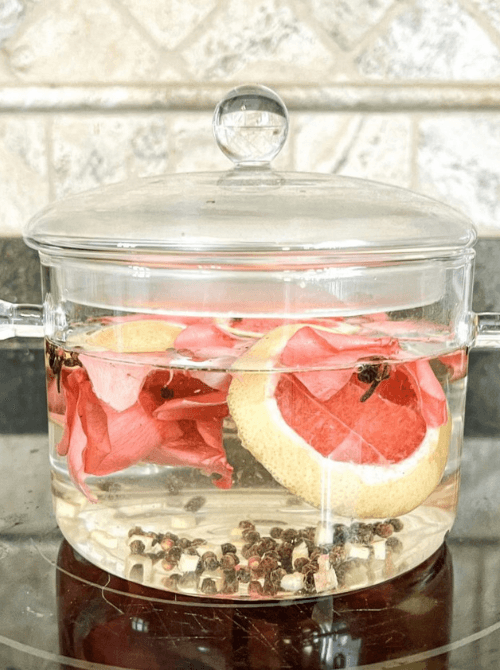
- How much does this craft usually cost to make?
About $2–$5, especially if you already have spices at home. - What should I grab at Dollar Tree for this project — and how many of each?
1 glass jar or stovetop container, decorative tags or twine, optional faux florals for display. - How long does it realistically take from start to finish?
5 minutes to prep, then a few hours simmering on low. - How easy is it, really?
Very easy. No crafting skills needed, just light supervision if kids help. - What makes this one stand out from the rest?
It adds scent to your Valentine décor, not just visuals. - How can I make it look more expensive?
Use a clear jar, neutral twine, and handwritten tags for a cozy display. - What can I swap in if Dollar Tree is out of something?
Reuse pasta sauce jars or tea-light holders.
Quick Callouts
- ✴️Easy craft using typical pantry staples
- ✴️Stands out because it adds scent to the room
- ✴️Fills the need for cozy, low-effort Valentine atmosphere
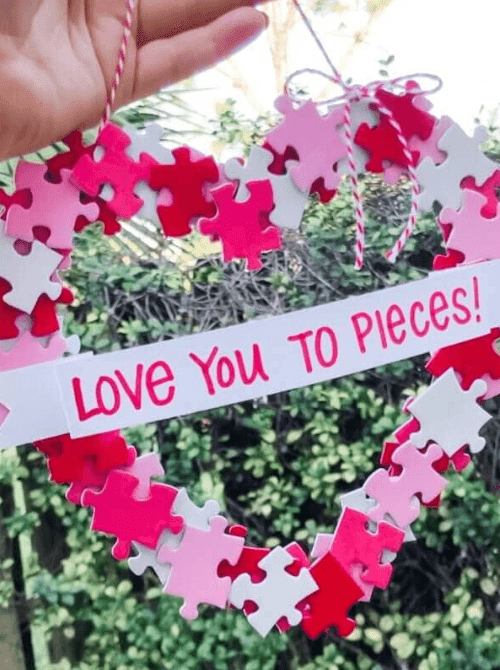
- How much does this craft usually cost to make?
Around $4–$7. - What should I grab at Dollar Tree for this project — and how many of each?
1 foam wreath form, 1 small puzzle, ribbon, glue sticks. - How long does it realistically take from start to finish?
20–30 minutes. - How easy is it, really?
Beginner-friendly, hot glue required. - What makes this one stand out from the rest?
The puzzle texture makes it playful and unique. - How can I make it look more expensive?
Spray-paint pieces in soft neutrals or metallics. - What can I swap in if Dollar Tree is out of something?
Use cardboard or pool noodles as wreath forms.
Quick Callouts
- ✴️Easy craft with simple supplies
- ✴️Excellent upcycled use for puzzles missing their pieces
- ✴️Great front door Valentine statement
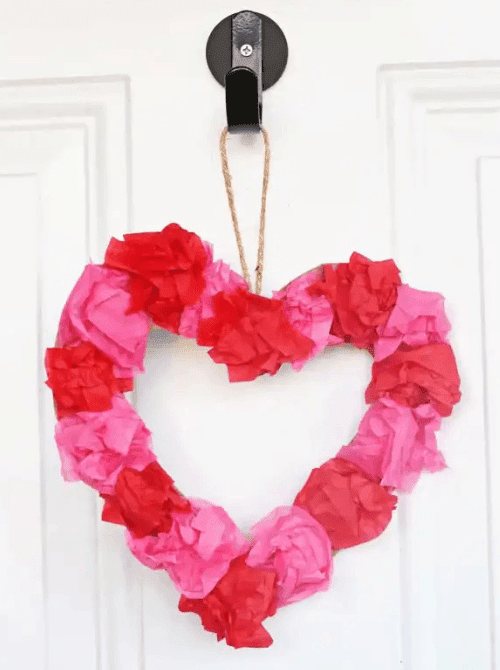
- How much does this craft usually cost to make?
About $2–$4. - What should I grab at Dollar Tree for this project — and how many of each?
Tissue paper packs, paper plates or cardboard circles, glue sticks, ribbon. - How long does it realistically take from start to finish?
20–30 minutes. - How easy is it, really?
Extremely easy — perfect for kids. - What makes this one stand out from the rest?
Fluffy texture makes it look fuller than paper crafts usually do. - How can I make it look more expensive?
Add metallic tissue accents and neutral ribbon. - What can I swap in if Dollar Tree is out of something?
Use coffee filters or crepe paper.
Quick Callouts
- ✴️Kid-safe and low-mess
- ✴️Simple décor you can reuse year after year
- ✴️Ideal for classroom doors or playrooms
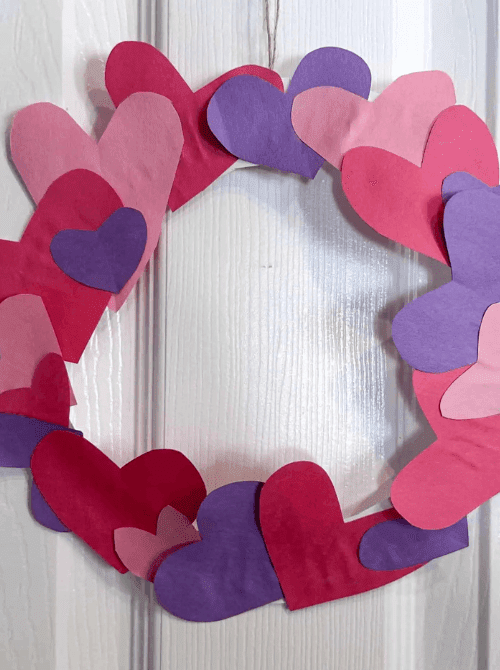
- How much does this craft usually cost to make?
About $1–$3. - What should I grab at Dollar Tree for this project — and how many of each?
Paper plates, construction paper, glue sticks, ribbon. - How long does it realistically take from start to finish?
15–25 minutes. - How easy is it, really?
Very easy — preschool friendly. - What makes this one stand out from the rest?
Super quick with minimal prep. - How can I make it look more expensive?
Use layered heart shades and soft ribbon. - What can I swap in if Dollar Tree is out of something?
Cut rings from cardboard boxes.
Quick Callouts
- ✴️Fastest wreath option
- ✴️Great for young kids
- ✴️Solves last-minute decor needs
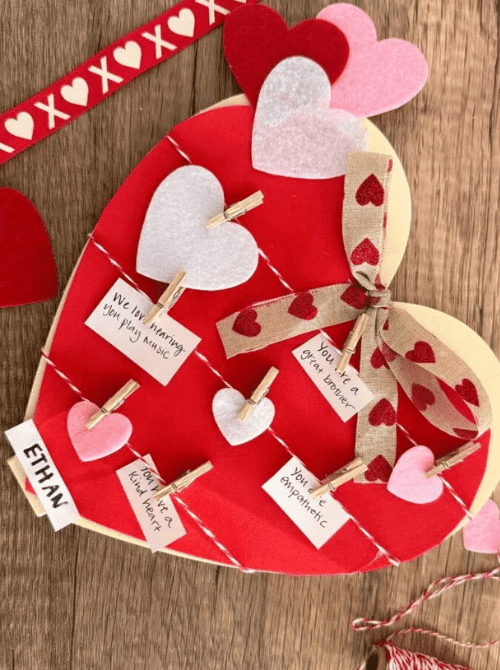
- How much does this craft usually cost to make?
About $4–$7. - What should I grab at Dollar Tree for this project — and how many of each?
Wood heart shape, mini clothespins, twine, felt hearts, cardstock. - How long does it realistically take from start to finish?
20–30 minutes. - How easy is it, really?
Beginner-friendly, kids can help. - What makes this one stand out from the rest?
It becomes interactive, not just décor. - How can I make it look more expensive?
Paint wood in neutral tones and add metallic clips. - What can I swap in if Dollar Tree is out of something?
Use a clipboard or foam board base.
Quick Callouts
- ✴️Turns decor into daily connection
- ✴️Interactive keepsake piece
- ✴️Great for families and classrooms
- How much does this craft usually cost to make?
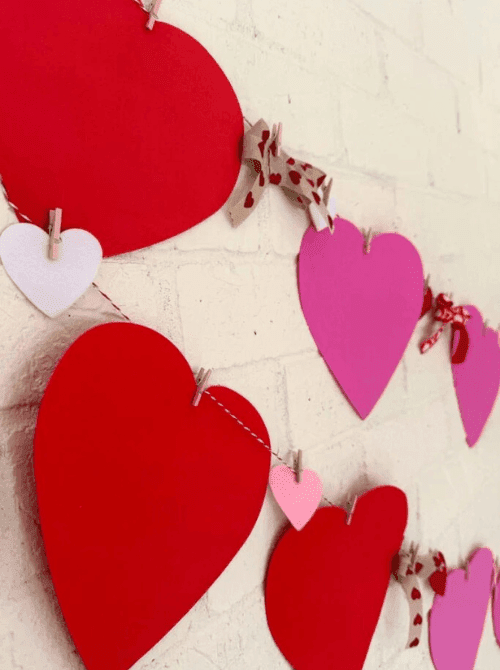
About $2–$5. - What should I grab at Dollar Tree for this project — and how many of each?
Heart cutouts, twine or ribbon, cardstock. - How long does it realistically take from start to finish?
15–25 minutes. - How easy is it, really?
Very easy — kids can help string hearts. - What makes this one stand out from the rest?
Lightweight, reusable, and flexible. - How can I make it look more expensive?
Layer heart sizes and use neutral twine. - What can I swap in if Dollar Tree is out of something?
Cut hearts from old greeting cards.
Quick Callouts
- ✴️Minimal tools required
- ✴️Works in any room
- ✴️Classic Valentine decorating staple
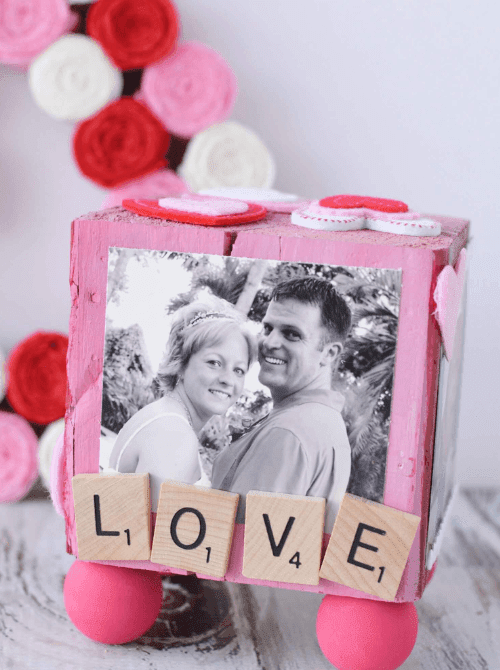
Valentine’s DIY Crafts to Gift
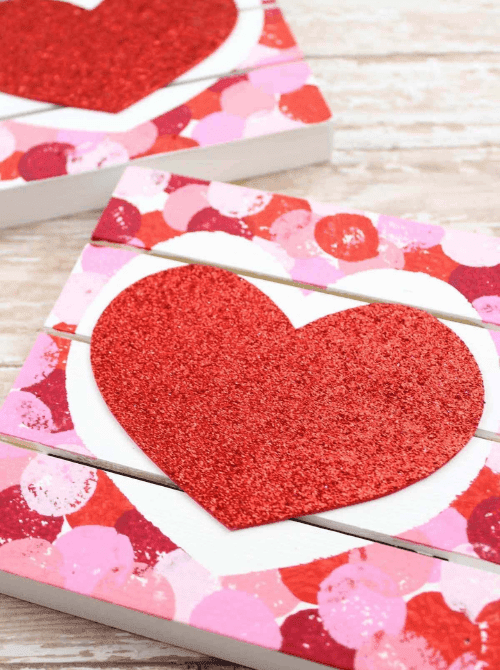
- How much does this craft usually cost to make?
About $3–$6. - What should I grab at Dollar Tree for this project — and how many of each?
1 wood block or plaque, craft paint, foam brushes, printed photo or cardstock, Mod Podge or glue, and optional embellishments like ribbon or stickers. - How long does it realistically take from start to finish?
Roughly 20–30 minutes (plus a few minutes of drying time for the adhesive). - How easy is it, really?
Beginner-friendly — simple painting and gluing means kids can help with supervision; steady hands help with placement. - What makes this one stand out from the rest?
It turns a simple photo into functional décor that feels personal — a keepsake rather than just seasonal decoration. - How can I make it look more expensive?
Use muted paint tones (blush, cream, soft gray), distress lightly with fine sandpaper, and add a small neutral ribbon or twine accent instead of bright Valentine’s ribbon. - What can I swap in if Dollar Tree is out of something?
Use foam board or thick cardboard instead of a wood block; print photos at home or trim scrapbook paper for the design.
Quick Callouts
- ✴️Uses photos you already have
- ✴️Functional décor with sentimental value
- ✴️Personalized keepsake décor that lasts
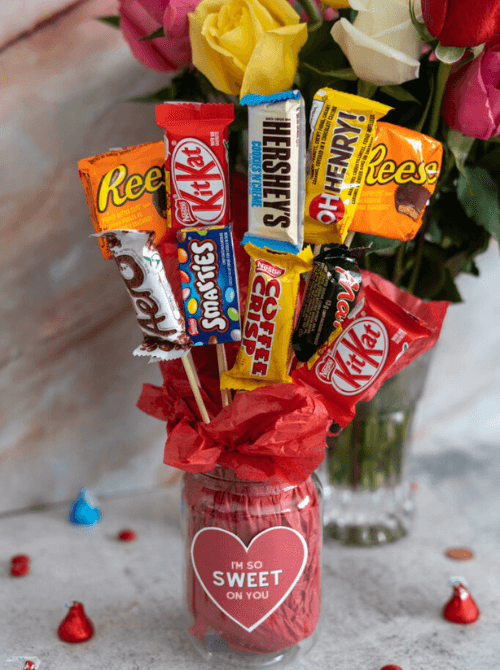
- How much does this craft usually cost to make?
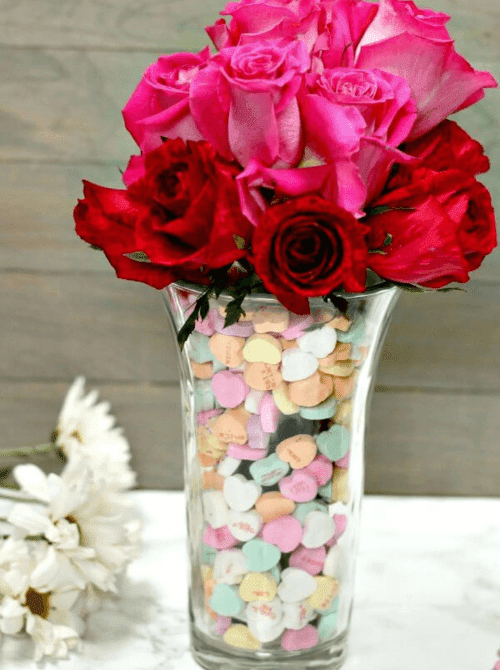
About $5–$9. - What should I grab at Dollar Tree for this project — and how many of each?
1 mason jar, floral foam or crumpled paper for filler, Valentine’s picks or faux florals, assorted candy (gummy hearts, lollipops, conversation hearts), ribbon or twine. - How long does it realistically take from start to finish?
15–25 minutes, once your candy and supplies are ready. - How easy is it, really?
Easy but slightly fiddly — arranging candy can take a little patience, but no advanced skills required. - What makes this one stand out from the rest?
It blends décor with treats — pretty enough for a centerpiece and tasty enough to actually give away. - How can I make it look more expensive?
Use neutral ribbon, layer candy by color, and tuck in a few sprigs of faux greenery instead of all bright Valentine colors. - What can I swap in if Dollar Tree is out of something?
Use water bottles or clean pasta jars if mason jars aren’t available; substitute foam with crumpled tissue paper or kraft paper.
Quick Callouts
- ✴️An easy setup that holds the candy in place so it actually looks like a bouquet
- ✴️Candy becomes décor and gift
- ✴️Sweet centerpiece or gift idea
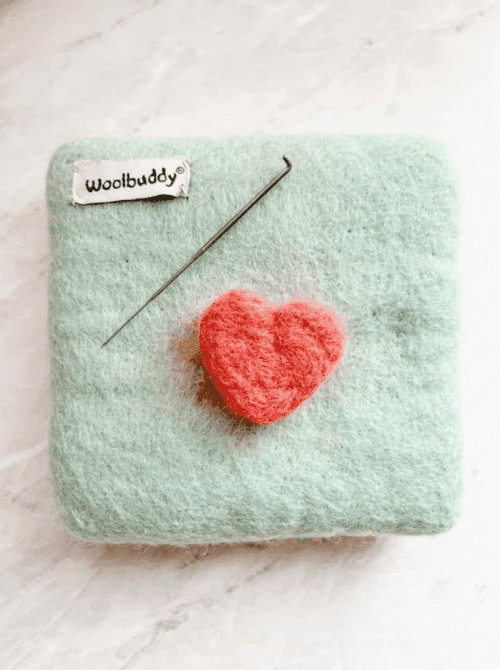
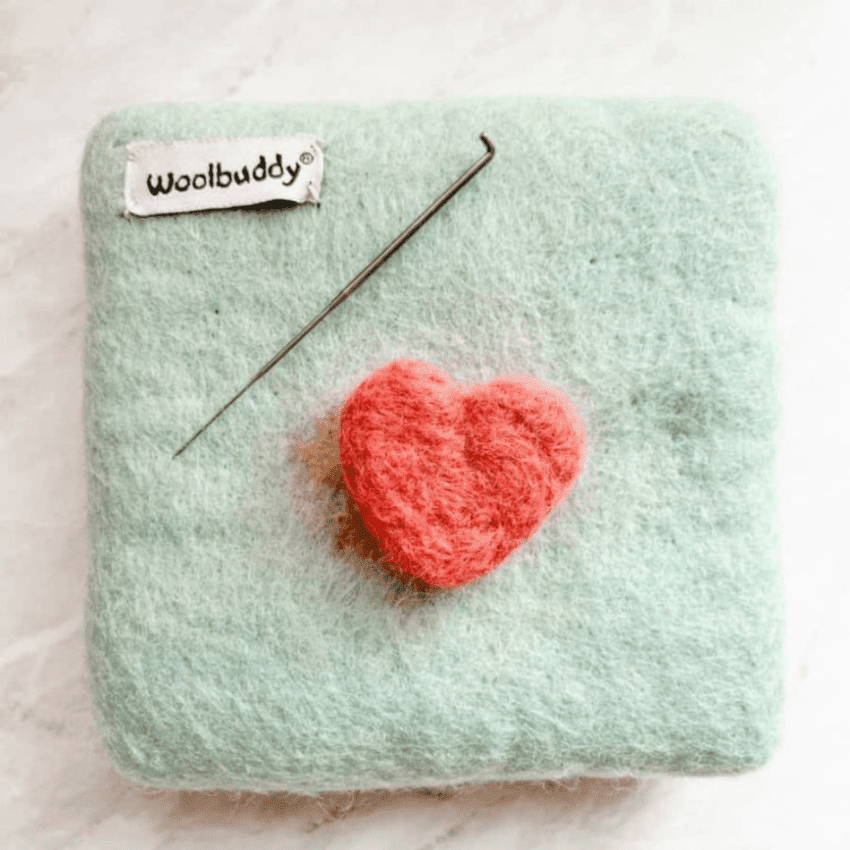
- How much does this craft usually cost to make?
About $5–$8. - What should I grab at Dollar Tree for this project — and how many of each?
If available: felt sheets or wool roving packs, and small foam pads (as a needle base). If felt tools aren’t at Dollar Tree, consider substituting felt sheets, yarn, or pre-cut fabric bits. - How long does it realistically take from start to finish?
Expect about 30–45 minutes depending on your rhythm (felting takes time but is calming). - How easy is it, really?
Moderate — it requires some patience and careful handwork (felting needles are sharp), so it’s better for adults or older kids with supervision. - What makes this one stand out from the rest?
It’s a tactile, cozy craft that literally feels like Valentine’s — soft hearts you can hang, pin, or gift. - How can I make it look more expensive?
Mix neutral tones with subtle pinks and reds, or add tiny metallic threads/yarn for shimmer without glitter. - What can I swap in if Dollar Tree is out of something?
No wool roving? Use felt sheets sewn together or layered yarn wrapped into heart shapes — still soft but without felting tools.
Quick Callouts
- ✴️Reusable tools and materials for future seasons
- ✴️Cozy, textured keepsakes
- ✴️A non-paper, sensory project that’s unique and giftable
Kid-Friendly Valentine’s DIY Crafts
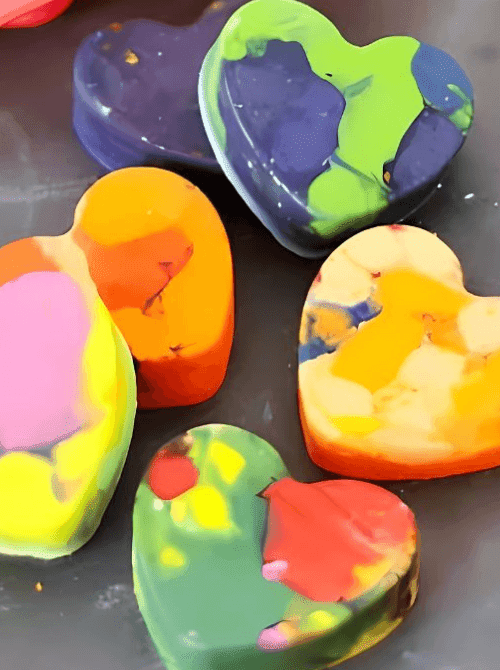
- How much does this craft usually cost to make?
About $3–$5. - What should I grab at Dollar Tree for this project — and how many of each?
Old crayons (or new ones from Dollar Tree packs), heart silicone molds (if available), and a baking tray or pan to melt them in. - How long does it realistically take from start to finish?
About 15–25 minutes, plus cooling time. - How easy is it, really?
Relatively easy — adults handle heat from melting crayons, but kids can help with peeling and sorting colors. - What makes this one stand out from the rest?
It’s a functional craft that doubles as a gift or activity — crayons you can actually use. - How can I make it look more expensive?
Sort crayons by coordinated color palettes (neutrals, pastels, ombré) before melting — the result looks far more intentional. - What can I swap in if Dollar Tree is out of something?
Use silicone ice cube trays or candy molds instead of classic crayon molds.
Quick Callouts
- ✴️Uses leftover crayons for zero-waste fun
- ✴️Practical and giftable
- ✴️Hands-on activity + small presents
- How much does this craft usually cost to make?
About $3–$6 per batch. - What should I grab at Dollar Tree for this project — and how many of each?
Clear or white glue, baking soda, contact lens solution (if allowed), food coloring, glitter or confetti hearts. - How long does it realistically take from start to finish?
5–10 minutes of active time plus a few minutes to adjust consistency. - How easy is it, really?
Easy but sticky — adult supervision recommended, especially with ingredients kids shouldn’t ingest. - What makes this one stand out from the rest?
Slime is hands-on fun that kids remember — it’s play and craft. - How can I make it look more expensive?
Use clear glue with layered glitter for a “jewel” effect instead of mixed colors. - What can I swap in if Dollar Tree is out of something?
Substitute cornstarch + hair conditioner for a DIY dough version if glue isn’t available.
Quick Callouts
- ✴️Quick to mix and play
- ✴️Sensory, interactive fun
- ✴️Keeps kids engaged and entertained
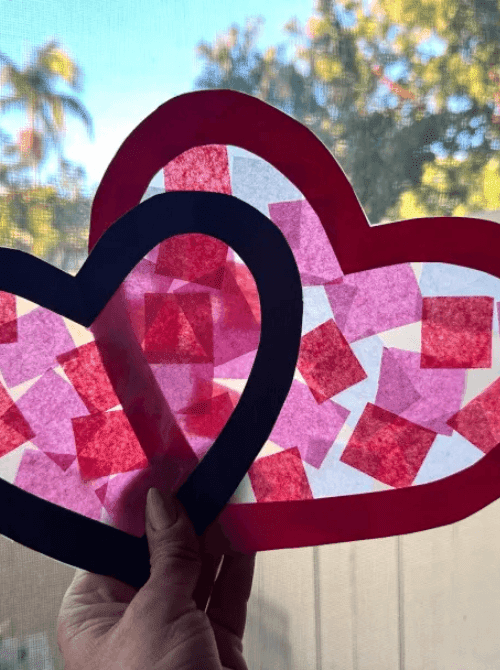
- How much does this craft usually cost to make?
About $2–$4. - What should I grab at Dollar Tree for this project — and how many of each?
Clear contact paper, tissue paper in Valentine colors, scissors, and ribbon for hanging. - How long does it realistically take from start to finish?
10–20 minutes. - How easy is it, really?
Very easy — great for young crafters with supervision. - What makes this one stand out from the rest?
It creates light-catching décor — bright and colorful in windows or doors. - How can I make it look more expensive?
Layer tissue paper in graduated tones or include neutral shapes (like white/cream) to soften the palette. - What can I swap in if Dollar Tree is out of something?
Use wax paper and lightly mist with water to hold tissue pieces instead of contact paper.
Quick Callouts
- ✴️Minimal tools required
- ✴️Adds a cheerful pop of color that looks great in sunlight
- ✴️Easy window art
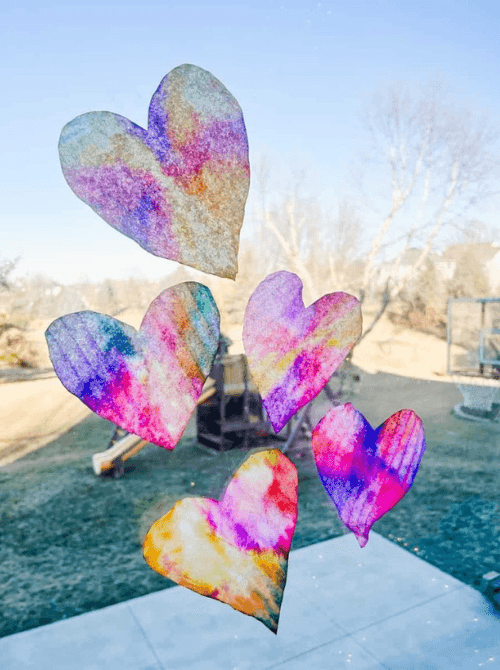
- How much does this craft usually cost to make?
About $1–$3. Basically zero assuming you drink coffee and have markers already. - What should I grab at Dollar Tree for this project — and how many of each?
Coffee filters, washable markers, spray bottle with water, string or ribbon. - How long does it realistically take from start to finish?
10–15 minutes. - How easy is it, really?
Extremely easy — great for kids and adults alike. - What makes this one stand out from the rest?
The color blending from water transforms simple markers into art. - How can I make it look more expensive?
Use coordinated color palettes or soft pastels instead of mixed rainbow colors. - What can I swap in if Dollar Tree is out of something?
Use paper towels or lightweight cardstock with watered-down paint instead of coffee filters.
Quick Callouts
- ✴️Simple materials + quick results
- ✴️Water-activated magic color effect
- ✴️Art + décor in minutes
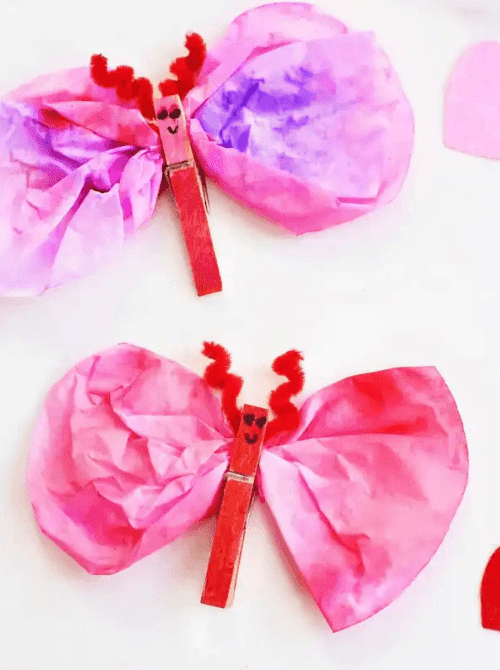
- How much does this craft usually cost to make?
About $2–$4 with basic craft supplies and coffee filters. - What should I grab at Dollar Tree for this project — and how many of each?
Coffee filters, washable markers, clothespins or pom-pom bodies, googly eyes, pipe cleaners. - How long does it realistically take from start to finish?
15–25 minutes. - How easy is it, really?
Very easy — geared especially toward kids with adult help for glue. - What makes this one stand out from the rest?
It turns simple shapes into characters — playful and delightful. - How can I make it look more expensive?
Use coordinated colors and neutral accents instead of the full rainbow. - What can I swap in if Dollar Tree is out of something?
Use small buttons or beads instead of googly eyes, and cut felt instead of pipe cleaners.
Quick Callouts
- ✴️Uses very basic supplies
- ✴️Playful, character-based craft
- ✴️Fun, kid-friendly activity
Paper and Gift Wrapping Valentine’s DIY Crafts
- How much does this craft usually cost to make?
About $5–$10 depending on what you already have at home. - What should I grab at Dollar Tree for this project — and how many of each?
Small vases or jars, faux flowers or picks, ribbon. - How long does it realistically take from start to finish?
20–30 minutes. - How easy is it, really?
Easy — Adult hands best for assembly. - What makes this one stand out from the rest?
It turns basic craft items into a table centerpiece, not just hanging décor. - How can I make it look more expensive?
Use neutral colors with a pop of red and add texture (twine, matte paint) instead of bright Valentine kitschy colors. - What can I swap in if Dollar Tree is out of something?
Use mason jars, wine glasses, or small bowls instead of vases.
Quick Callouts
- ✴️No need for filler foam
- ✴️Centerpiece for table or mantel
- ✴️Looks intentional, not kiddie

- How much does this craft usually cost to make?
About $2–$4 per bag with basic treats and paper bags. - What should I grab at Dollar Tree for this project — and how many of each?
Paper treat bags, markers, foam stickers or paper circles for emoji faces, small candies or goodies. - How long does it realistically take from start to finish?
10–15 minutes per bag. - How easy is it, really?
Very easy — perfect for a classroom assembly line. - What makes this one stand out from the rest?
Emoji faces are playful and modern — not just hearts everywhere. - How can I make it look more expensive?
Match candy colors to bag design or add a simple ribbon accent. - What can I swap in if Dollar Tree is out of something?
Use lunch sacks or colored envelopes if bags aren’t available.
Quick Callouts
- ✴️Very few supplies + no hot glue
- ✴️Trendy emoji twist
- ✴️Perfect for school treats
- How much does this craft usually cost to make?
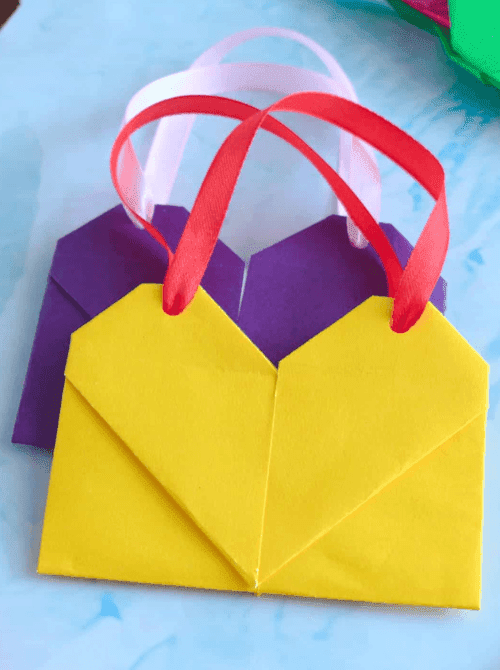
About $1–$3. - What should I grab at Dollar Tree for this project — and how many of each?
Cardstock, craft paper, scissors, double-sided tape, and ribbon or twine for handles. - How long does it realistically take from start to finish?
15–25 minutes. - How easy is it, really?
Easy — folding and taping skills are all it takes. - What makes this one stand out from the rest?
It’s functional packaging you can fill with treats or small gifts. - How can I make it look more expensive?
Use coordinating colors, subtle patterns, and a small tag — plus twine instead of cheap ribbon. - What can I swap in if Dollar Tree is out of something?
Replace cardstock with brown kraft papers or recycled gift wrap.
Quick Callouts
- ✴️Doubles as gift wrap
- ✴️Practical + decorative
- ✴️Wallet-size gift bag option
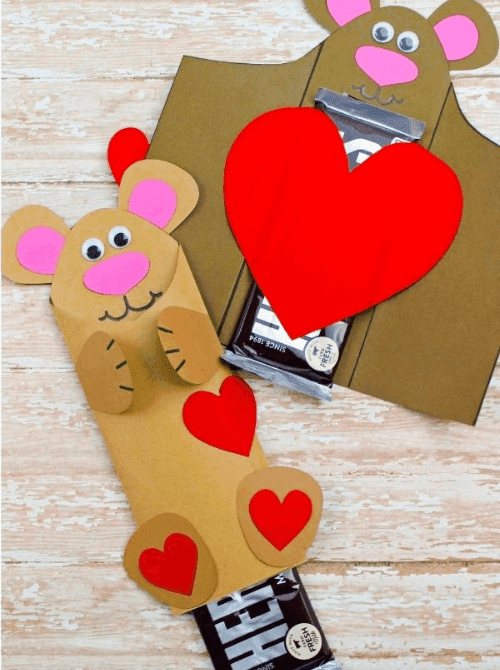
- How much does this craft usually cost to make?
About $2–$4. - What should I grab at Dollar Tree for this project — and how many of each?
Candy bars (standard size), cardstock or themed paper, markers or stickers, and tape. - How long does it realistically take from start to finish?
10–20 minutes depending on detail. - How easy is it, really?
Easy — adults help with wrapping, kids help with decorating. - What makes this one stand out from the rest?
It turns everyday candy into a personal, cute little gift. - How can I make it look more expensive?
Print a simple neutral design or coordinated pattern on cardstock before wrapping. - What can I swap in if Dollar Tree is out of something?
Use plain paper with colored markers or recycled craft paper.
Quick Callouts
- ✴️Easy wrap and stick with glue stick
- ✴️Candy becomes cute keepsake
- ✴️Inexpensive, personal treat idea
Mess Free Clean Up Tips
Crafting always feels calm in the moment — the table covered in hearts, kids comparing whose looks better, that little sense of accomplishment when a project finally comes together. It’s usually later, when everyone’s gone, that you notice the trail it left behind: glitter worked into the chair cushions, glue dried onto every surface, paint smudges you swear weren’t there before. Those are the moments that make you think twice about pulling out the craft bin ever again.
A few simple habits before you even start can change that completely. When you’re working with such messy supplies a little prep up front saves you from the three-day cleanup that makes crafting feel more stressful than it should.
Cover once, wipe once
Use plastic tablecloths, freezer paper, or parchment paper to cover your workspace. When you’re done, roll it up and toss it — no scrubbing dried glue off the table.
One tray per project
Dollar Tree plastic trays or shallow bins keep each craft contained. Kids are less likely to spread supplies across the room, and you can carry everything away in one trip.
Line your glue station
Place a paper plate or scrap cardboard under the hot glue gun. Drips land where they should, not on your counters.
Keep wipes within arm’s reach
Baby wipes or wet paper towels save your sanity. A quick wipe before paint or glue dries is the difference between “done” and “what happened here?”
Aprons over outfits
An old button-down shirt or apron protects clothes and makes it easier to relax and let kids help.
Shake glitter outside
If you’re using glitter or sequins, sprinkle them outdoors or over a trash can. It keeps the sparkle where it belongs — not in your carpet.
Pack away wet pieces
Use cardboard flats or cookie sheets to move drying crafts without touching them. No fingerprints, no smudges, no trail of paint across the house.
Final Thoughts
There’s something satisfying about looking around your house in February and realizing the Valentine’s décor didn’t come from a rushed shopping trip. It came from an evening at the kitchen table, a few Dollar Tree finds, and time you set aside for yourself or your family.
Valentine’s DIY crafts on a Dollar Tree budget become more than decorations. They turn into moments — painting frames, kids proudly holding up their hearts, and small gifts that actually feel personal. When everything gets packed away, it’s not the price tags you remember, but the time spent making something together.


1 thought on “Valentine’s DIY Crafts on a Dollar Tree Budget”
Comments are closed.